|
Chapter
13
Advanced
Techniques
In this final chapter
of Part III we’ll consider some Photoshop techniques that might be
considered by novice users to be relatively advanced, though Photoshop “power
users” will no doubt find them trivial
and mundane. For
the online edition of this book, this section on advanced
post-processing techniques will likely grow considerably over time, so
please check back regularly for updates.
13.1
Replacing
the Background
The first technique we’ll consider
is that of replacing, wholesale, the entire
background region of the image. In section 12.6
we considered
methods for de-emphasizing the background, particularly through the use
of massive blurring to achieve an effect similar to the smooth bokeh
from a shallow depth of field. Two limitations of that method are
that the resulting backgrounds will still have roughly the same color
as before (though it can be modified via hue and saturation
adjustments), and that the resulting backgrounds can end up so smooth
and textureless that they look boring and artificial. While it’s
generally desirable to keep the background from being too detailed and
distracting, moderate amounts of detail in the background can be
beneficial, because it gives the viewer’s eye something to contemplate
after s/he has had a chance to take in the foreground. Indeed, as
we mentioned in section 8.1, the visual
dynamics that result from
foreground and background competition for the viewer’s attention can
(in some cases) improve the overall aesthetics of an image. When
the original background of an image doesn’t satisfy these
considerations, replacing the background with that from another photo
can sometimes help to improve the image.
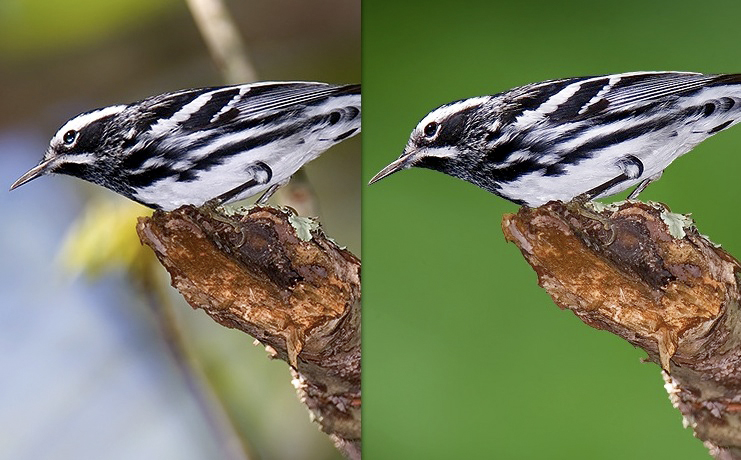
The figure below illustrates some of these subtle
issues. The image on the left is the original; the image on the
right shows the result of replacing the background with a less “busy”
one. The image on the right clearly focuses the viewer’s
attention on the bird more than the image on the left, but it also
drastically alters the overall color composition of the scene. In
cases like this, it may be better to instead explore your options for
improving the existing background through the judicious use of blurring
and selective editing (e.g., removing the tree branch in the background
via the Clone tool—see section 11.5).
Fig. 13.1.1:
Replacing the background of an image is a very powerful
technique, but it’s not always the best course of action. In this
case, the
original image (left) had lots of nice background color; the distracting
branches could have been erased via the Clone tool. After
replacing
the background (right), the image is less cluttered, but also somewhat
less interesting. Finding the right balance is What It’s All
About.
Actually replacing the background
is, in many cases, not nearly as difficult as you might imagine—as long
as you’ve got a background image that you can use. You’ll
generally want to use an entire image for the new background, rather
than trying to copy the background from part of another bird
photo. I make a point of taking a few severely out-of-focus
photos (of the scenery, not of a bird) in each shooting environment I
find myself in, in case I need to replace any bird photos’ backgrounds
and want the color composition to remain consistent. I also try
to collect such background images into a central place in my archives,
so I can easily find a background when needed.
The following series of figures illustrates the
actual replacement technique in simple
steps. The first step is to select the foreground—including
both the bird and any other elements that you want to retain in the
image—and to save that selection into a named channel (see section
10.6). The
figure below shows the original image and foreground selection.
Note that for this application (replacing the background) it’s
typically the case that you’ll want to be fairly exacting in your
selection; for this example I zoomed in and refined the edges of the
selection by nudging them as needed with the Quick Selection
tool. As we’ll see in a bit, errors in the selection can
be
mended later by instead modifying the layer mask that we’ll be creating
for the background layer; nevertheless, I personally prefer to refine
the selection boundaries during the actual selection phase, since I
find the Quick Selection tool
to be very efficient for this task, even
when working at the level of fine details on the zoomed-in image.
Just how finely those details need to be followed depends, of course,
on what you intend to do with the image: for posting small resolution
images on the internet, the finest details can often be ignored, while
for printing on large media you’ll likely want to be more exacting.

Fig. 13.1.2:
Preparing an image for background swapping. First,
select all of the foreground elements that you wish to retain in the
final
image (depicted here). Then invert the selection so that the
background
is selected instead of the foreground (not shown here). Save the
background
selection. When you’re ready to create the new background layer,
this selection
will be used to create a layer mask for the background layer, which
will permit
the foreground pixels to show through from the underlying layer.
Once you’ve got the foreground
selected, you can invert it (via Select
> Inverse) and then save the resulting background selection
to a named channel. You can now load your background image into
Photoshop, select the
entire background image, copy it via Cmd-C
/ Ctrl-C, and then paste it
as a new layer in the first file (via Cmd-V
/ Ctrl-V). In the Layers
panel
you’ll see two layers: the original foreground layer at the bottom
(which will, unfortunately, be automatically labeled “Background” by
Photoshop), and the new background layer, which will be above it.
Next, click on the new background layer in the Layers panel, and bring up the
background selection via Select >
Load Selection (or, alternatively, bring up the foreground
selection and invert it). The
inverted outline of the foreground should now be superimposed on the
background
image, via the original foreground selection. With the
selection still active, click on the Add
Layer Mask button at the
bottom of the Layers
panel. A layer mask will be created, with
the mask initialized to the (inverted) shape of the foreground.
The figure
below illustrates what you should see in your Layers panel after doing
this.
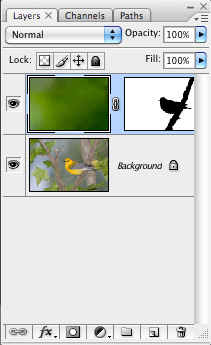
Fig. 13.1.3:
The Layers panel after pasting in
the new background layer. Take note of the
layer mask, which as you can see takes the
shape of a bird on a branch. The layer mask
is what allows the foreground to show through,
by defining the transparent region of the background
layer. You can refine the layer mask as needed to
achieve smoother blending effects.
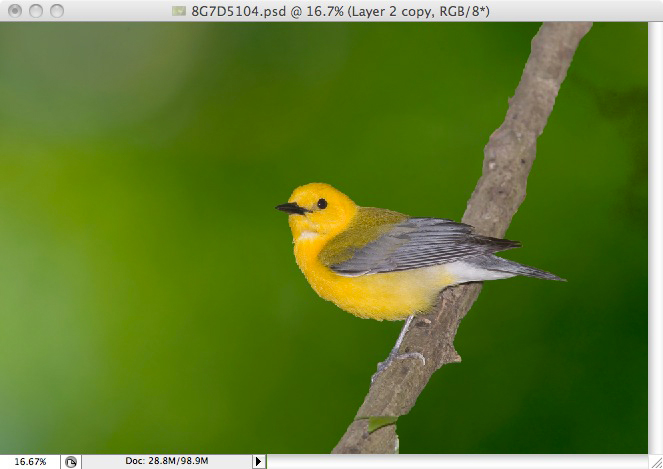
Fig. 13.1.4: A
preliminary version of the merged image. The foreground
shows through, just as planned. However, some of the foreground
edges
appear unnatural, due to the shallow depth of field (particularly at the
far end of the branch, which is out of focus). These types of
artifacts
can be corrected by blurring parts of the layer mask.
Notice in the figure above that
the far end of the branch looks odd: its edges meet too abruptly with
the background. The problem is that the far end of the branch is
out of focus (due to the shallow depth of field) and therefore soft,
but the edges appear unnaturally hard due to the layer mask.
Normally, the edges of out-of-focus
objects appear very soft. We could have prevented this by feathering
(section 10.6) just that part of the selection
prior to creating the
layer mask, but
we can achieve the same effect now by using a soft-edged brush to paint
along the edge of the layer mask. The layer mask is black and
white (actually, grayscale),
so when softening edges in the layer mask you just need to
choose a black or white color for the brush (or a shade of gray).
Click on the layer
mask itself (to indicate to Photoshop that you want to modify the
pixels of the mask rather than the actual image pixels of the layer)
and then simply paint with the soft-edged brush in the main window in
Photoshop. As you paint you’ll see the pattern in the layer mask
changing, and you’ll also see the effects of changes to the layer’s
transparency, as more or fewer of the pixels from the lower layers
show through (in the main Photoshop window). The figure below
shows the result of softening the edges of the distant part of the
branch in this way. The near part of the branch was also repaired
using the Clone tool.
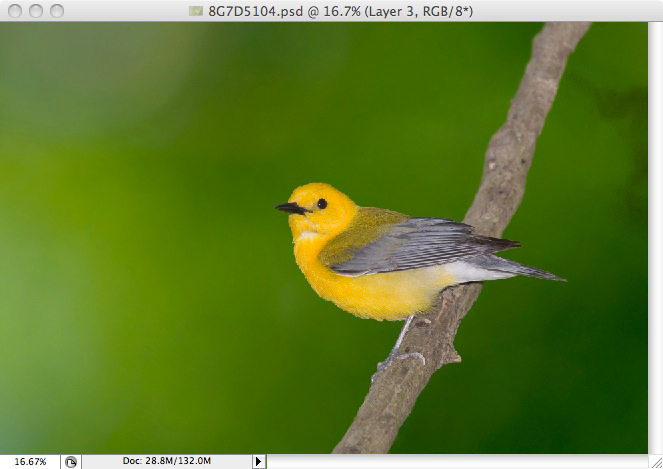
Fig. 13.1.5:
The corrected image, after blurring parts of the layer mask
and repairing the nearer portion of the branch using the Clone tool.
Note that
softening the edges of a layer mask can also be done by selecting parts
of the layer mask and applying Gaussian
Blur. Indeed, just about
any adjustment that you can make to a layer’s pixels can also be made
to a layer’s mask, since the mask is itself nothing more than a
grayscale image. The black pixels in the layer mask cause
the corresponding pixels in the layer to be transparent, while the
white pixels in the mask cause those pixels in the layer to be
opaque; shades of gray impose corresponding degrees of opacity and
hence cause blending. Applying effects like Gaussian Blur to the mask alters
the mask’s pixels, which in turn alters the transparency pattern of the
layer. In section 13.2 we’ll use this
fact to create artificial
clouds in the sky by rendering cloud patterns into the layer mask, so
that lighter pixels from a lower level show through those
semi-transparent areas. A similar trick can be used to add
texture to a background by duplicating the background, modifying the
brightness of the lower layer, and then painting into the upper layer’s mask with
an appropriately textured brush.
The figure below shows a more challenging example,
where more subtle blending of the foreground and background layers was
required in the wings, due to the motion blur. This was achieved
in this case by painstakingly brushing over appropriate parts of the
wings in the background layer mask with a soft, low-opacity brush to
allow the background to show through a bit in those regions; it’s
likely, however, that a simpler approach could have been found, such as
via the use of blurring filters (applied to the layer mask) or
feathering (applied earlier, during selection). Remember that
there are usually multiple ways to achieve the same thing in Photoshop,
and some of those ways often take far less effort than others.
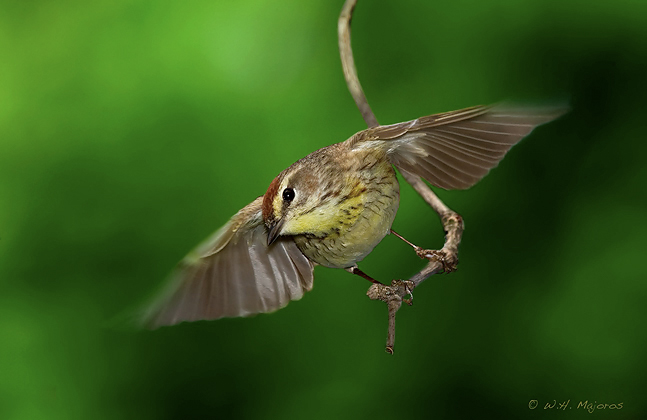
Fig. 13.1.6: A
more difficult exercise in image compositing.
The motion blur of the wings introduces considerable difficulty, since
the original background differed in color from the new background.
This was rectified here via very careful use of a soft-edge, low-opacity
brush applied to the layer mask of the background layer, to achieve
a more realistic blending.
If you look closely enough at the
above figure, you’ll surely find some processing artifacts (such as the
thin, dark line along the belly). After performing major image
surgury like that illustrated here, it’s a good idea to go over the
image with a fine-toothed comb to search for any artifacts that need to
be cleaned up after the fact. I recommend zooming in one or two
factors of magnification and then panning over the whole image to look
for defects. Some defects you’ll be able to repair fairly simply,
by modifying a few pixels in a layer mask. Others will require
the use of the Clone tool.
If you haven’t yet mastered the Clone
tool, then it’s a good time to start getting more experience
with it; many advanced post-processing techniques depend crucially on
either this tool or on the use of related methods that result in
copying pixels from one place in the image to another (or from another
image altogether, as in the case of replacing a scene’s natural
background).
In this section we’ve relied heavily on the use of
layers and layer masks. It’s worthwhile to just briefly mention
two related layer-oriented tricks that you can use in your
post-processing, either to simplify things or to reduce memory
requirements (or both). Duplicating a layer obviously incurs a
memory cost, since all of the pixels in the original layer now need to
be represented twice. This will result in larger file sizes and
in greater demands on run-time memory, which may or may not be an issue
for you, depending on how souped-up your computer is. The first
trick is the use of smart objects
in Photoshop. When clicking the Open
Image button in Adobe Camera Raw (ACR), if you hold down the Shift key while clicking the
button, the Open Image button
should change to say Open Object.
The image will then be opened in Photoshop as a smart object rather than as a
standard image file. The difference is that any filters or
effects that you apply to the image will be stacked into a set of smart filters to be dynamically
evaluated during rendering of the image, rather than being applied
statically to the layer’s pixels right then and there. The figure
below shows the Layers panel
after three image effects (Shadows/Highlights,
Reduce Noise, and Unsharp Mask) were been applied to
a smart object.
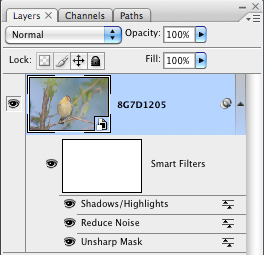
Fig. 13.1.7:
Smart objects and smart filters.
When a RAW file is opened as a smart object
(by pressing the Shift key while clicking Open
in ACR), any filter that is applied to the image
then becomes a smart filter. By clicking on any
of the smart filters that have been applied (in the
layers panel), you can then adjust any of their
parameters. You can also drag them up and
down in the stack to change their ordering.
The advantage
of smart filters is that they automatically update the image whenever
anything in the filter chain changes. For example, if you insert
a new filter partway through the filter chain (say, between Unsharp Mask and Reduce Noise in the example above),
all filters above this in the chain will be dynamically re-evaluated
and the sum effect on the rendered image will appear on screen in “near real time” (though on many computers this
can be a slow process, so “near real time” is rather relative). The
importance of ordering in the filter chain should be obvious if you
think about a simple example: sharpening versus noise reduction.
Since sharpening emphasizes noise, sharpening before noise reduction can make the
noise reduction less effective. On the other hand, noise
reduction obliterates details, so sharpening after noise reduction may result in
less subject detail. Deciding on the ideal ordering may require
you to consider both orderings as well as different parameter settings
for both filters. The point is simply that ordering does matter,
and with smart filters you can modify that ordering by simply dragging
the filters up or down in the stack using your mouse.
Smart objects and smart filters fall under the
rubric of what digital artists call nondestructive
editing—that is, editing operations that don’t actually modify
the original, underlying representation, so that they can be undone at
any point in the future. By comparison, although the history facility in Photoshop
(section 10.5) provides a sort of “undo” capability, undoing something far
back in time requires that everything done between then and now also be
undone. Editing in this paradigm is very linear (in time).
The goal of nondestructive editing is to allow adjustments performed
arbitrarily far back in time to be re-parameterized as needed.
For example, in the above figure we sharpened the image prior to
reducing noise and then adjusting the shadows and highlights. If
we then decide that the image looks a bit over-sharpened, we can go
back and adjust the sharpening parameters (e.g., the amount and radius)
without having to undo the noise reduction and shadow/highlight
adjustment. The changes to the sharpening parameters will
automatically propagate through the smart-filter chain, and the result
will be apparent on-screen in near real-time. I personally don’t
use smart objects much, because on my computer (a newest generation
Apple laptop) there is still a bit more latency in the updates of the
filter chain than I’d like. But I still think it’s a great idea,
and if I wasn’t so lazy I’d spend more time trying to get used to using
it.
Another great idea that I personally don’t use much
(but probably should) is the adjustment
layer in Photoshop. Adjustment layers are basically just
like smart filters, except that they can be applied to any image, not
just to smart objects. In Photoshop version CS3, smart filters
are primarily limited to true filters (under the Filter menu), largely precluding
other operations such as those under Image
> Adjustments. Adjustment layers remedy this
shortcoming by permitting non-filter image adjustments to be applied in
a manner just like smart filters. The figure below shows an
example. The smart object is the lowest layer; above this we’ve
applied two adjustment layers: Levels,
and then Hue/Saturation.
The parameters of either of these adjustments can be changed at any
time by simply double-clicking the adjustment layer, which will bring
up the appropriate adjustment dialog with all the parameter
sliders. You can then change any of the sliders, press Enter/Return and see the result as
the image is automatically updated to reflect the parameter
changes. Note also that adjustment layers can have their own
layer masks, so they can be applied to specific parts of an image, just
as with traditional selection-based processing (i.e., the D-PIE technique described earlier: Differential Processing of Image Elements).
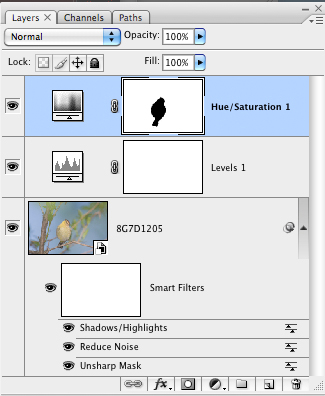
Fig. 13.1.8:
Adjustment layers. Here, we’ve applied
three smart filters to a smart object, and then applied
two adjustment layers (Levels and Hue/Saturation),
which are shown as layers above the smart object.
By clicking on either adjustment layer we can update
the adjustment parameters at any time. Adjustment
layers can also have layer masks, so that adjustments
can be applied just to specific parts of an image if desired.
Smart filters
and adjustment layers can be great time savers, because they allow you
to go back and correct parameter settings long after you originally
applied the effect. Without these special features, you’d have to
undo everything since the original effect was applied, redo the effect
with the new parameters, and then replicate all of your processing
since them. One thing that I don’t like about these dynamic
filter chains is that the preview that I see on-screen sometimes seems
to differ in subtle ways from what I see when I export the image as a
JPG and then view the resulting JPG file statically. Whether this
is still an issue with the newest versions of Photoshop is unknown to
me at this point. Also, it’s entirely conceivable that there may
be instances in which you wouldn’t want changes to layers lower in the
stack to be reflected in higher layers; this would presumably require a
change back to the opaque layer method—i.e., avoiding the use of an
adjustment layer or smart filter.
|
|
|