10.6 Selection
Of all the processing features
available in Photoshop, the most powerful—for processing bird
photos—is, by far, its array of tools for selecting parts of an image
and processing those elements differently from the rest of the
scene. The flexible
and efficient selection methods in Photoshop are nothing less than a
godsend to bird photographers. The reason is simple: people who
spend time looking at (or even buying) bird photos do so because they
are, in the majority of cases, inordinately fond of birds. They
therefore place greater importance on the aesthetic qualities of
the bird in any given image than would a casual viewer, and are
by-and-large impressed the most by
photos in which the bird stands out prominently from its
background. Notwithstanding the proverbial
exception-to-every-rule, for avian art the bird, as the principal
subject, needs to occupy a central place in the awareness of the viewer
(even if not centrally located in the image frame). Differential
processing of the bird versus its background—even if only subtle—is
thus a key capability in any workflow involving the producion of avian
art.
We’ve already seen, in section 10.3,
that Photoshop
allows for efficient differential processing via the separation of
image elements into different layers
(though we’ll see later that
differential processing is possible even without the explicit use of
layers). In order to separate image
elements into different layers, however, you first need to be able to select them.
That is precisely what we want to address in this
section: how to select the bird (or any other part of the image) via
the cursor-controlled tools available in Photoshop. In
particularly, we’ll want to explore how to select the bird efficiently (without having to
spend excessive amounts of time fiddling with the computer’s mouse) and
accurately (so
that the selection
boundary follows the bird’s outline with sufficient exactitude).
We will proceed via concrete examples. The
first is illustrated below. Here, the bird has been hastily
selected via the Lasso tool
in Photoshop. The black-and-white
dashed line roughly following the bird’s contour indicates the current
selection. As you can see, this selection isn’t perfect, since
some parts of the bird lie outside the selection, and a few pixels from
the background fall within the selection. For some applications,
such a sloppy selection may be good enough for the task at hand, but
for many it won’t. We’ll see shortly how to get more accurate
selections using other tools.
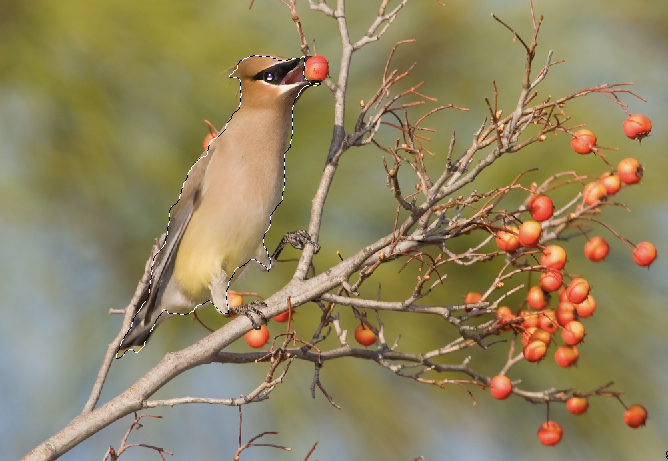
Fig. 10.6.1:
Selecting the bird using the Lasso tool. This selection is very
sloppy: some of the bird lies outside the selection, and a few pixels
from
the background lie within the selection. The Lasso tool is very
difficult
to use (especially with a trackball), so I recommend avoiding it.
The way this selection was created
is as follows. First, I clicked on the Lasso tool’s icon in the
toolbar. Then I clicked on an arbitrary starting point on the
bird’s outer boundary, and then without releasing the mouse button I
dragged the mouse cursor (using my computer’s trackball, which is
similar to a mouse) so as to trace the outline of the bird. When
I had traced a complete circuit around the bird’s outline, I released
the mouse button. Selecting a bird this way can be quite tedious,
and is rarely as accurate as you’d like.
Fortunately, there are
better options in Photoshop for selecting complex shapes—options that
can be far more accurate without requiring much more effort (once
you’ve had some practice). Some of
Photoshop’s selection tools are depicted in iconic form in the figure
below.
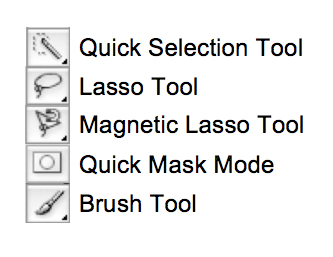
Fig. 10.6.2:
Some of the selection tools in Photoshop’s
toolbar. Clicking on a tool’s icon in the toolbar turns
your mouse cursor into that tool. For the icons with a
small triangle in the lower right corner, holding down
the mouse button while clicking the icon will bring up
a second palette with additional tools in the same family.
Most tools have keyboard shortcuts, for faster access.
We’ve already encountered the Lasso tool; the Magnetic Lasso tool is
similar, except that the computer tries to help you by fixing what it
perceives as your “mistakes” (i.e., errors in the trajectory
of your
mouse cursor), while you’re in the process of making
them. For example, if while tracing the bird’s contour with the
mouse cursor you accidentally slip and veer outside the bird’s contour
a bit, the Magnetic Lasso will (in the ideal case) notice your mistake
and automatically correct it for you by re-routing the selection
boundary to correspond more closely with the outer edge of the
bird. This can work well if the bird’s contour is strongly
defined in the image (i.e., via an abrupt contrast differential at the
pixel level), but in many cases the tool will get confused and re-route
your selection in a way that makes it worse than if it hadn’t
intervened. This tool can be very frustrating to use.
Fortunately, there’s a better way: the Quick Selection tool. This is
the method I use for 95% of my work. It has some predictive
intelligence built into it, much like the Magnetic Lasso, but is far
easier to control, as we’ll see. The main technological
difference is that with the Quick Selection tool you’re selecting regions, not boundaries, and the tool can
quickly infer what you’re trying to select in the image by studying the
pixels you’ve already selected (as well as those you’ve explicitly de-selected). Because it has
more data to work with (i.e., more pixels to learn from), it often
makes much more intelligent decisions than the Magnetic Lasso.
Let’s consider how this remarkable tool can be used in practice to
rapidly and accurately select a bird from an image.
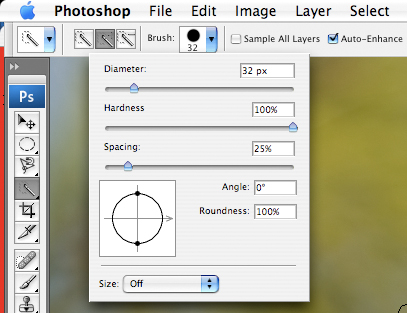
After clicking on the Quick
Selection tool’s icon in the tools palette, you’ll then need to select
a brush size, as
depicted in the figure below. The “Diameter”
slider controls your brush size (we’ll consider “Hardness” in just a
moment—for now you should leave it at 100%—but the other parameters you can
simply ignore). A good rule of
thumb is to start out with a brush size that is larger than the bird’s
eyeball, but smaller than its head.
Fig. 10.6.3:
Setting the brush size in the Quick Selection tool.
The brush size is important, because you’ll be using the brush
to sweep out regions that you want to select, and if the brush
is too big it won't be able to fit in all parts of the bird, while
if it’s too small it’ll take to longer to sweep out the whole bird.
A good rule of thumb is to choose a size larger than the bird’s
eyeball but smaller than its head. You’ll see the size of your
cursor change as your move the Diameter slider.
Once you’ve chosen a brush size, you’re ready to select the
bird. To do so, simply click the computer’s mouse anywhere inside
the bird,
and while still holding down the mouse button, drag the mouse cursor
around inside the subject. Photoshop will try to intelligently expand your selection to the
nearest natural boundaries in the image. In many situations, this
works very well—often extremely
well—in which case you’ll see the
selection contour almost magically expand to the precise outline of the
bird. In other cases it’s not quite so impressive, but at least
in the case of birds I’ve almost always found this tool to be the most
efficient means of selecting the subject. It does require some
practice, however, and there are a few important tips you need to be
aware of.
First, you can use the tool to both add to the selection and to subtract from it. Note that
in the tool’s settings pane
there are several icons, two of which look like this:
Make sure you click on the left icon (with the “+” sign) before you begin using the
tool. That will allow you to add to your original selection by
making additional clicks and sweeps with the mouse. If you
accidentally draw outside the bird, or if Photoshop is too aggressive
in automatically expanding your selection region, you can de-select regions by holding down
the option/alt key while
using the tool.
Holding down the option/alt
key temporarily puts the tool into its “subtract” mode; you’d get the same behavior
by exlicitly clicking on the second icon shown above (the one with the
minus sign), but I find that it’s much faster to just keep my finger on
the option/alt key when I’m using this tool, and then I can quickly
press or release that key as needed to switch between the add and
subtract modes. Once you become skilled at using this tool in
both its add and subtract modes, you’ll be able to rapidly select just
about any bird through a series of sweeps with the Quick Selection tool.
Note that you can use the tool in subtract mode even
on
regions that haven’t been selected—doing so explicitly tells Photoshop
that you don’t want it to
select that region later when you go into the
add mode and sweep the cursor nearby. This can be useful when you
notice that some part of the bird blends into the background.
If you just used the add mode you might find that when you near that
part of the bird the selection suddenly expands to include the entire
background region, which might then take a bit of work to explicitly
de-select. If you were instead to sweep out the “off-limits” area in the region where the bird
blends with its background, effectively tracing out a boundary that the
selection should not cross, then when you later switch to the add mode
you should find that Photoshop is more reluctant to expand the
selection into that off-limits region.
When using this tool you’ll also need to make
changes to your brush size periodically. As suggsted above, a
good rule of thumb is to start with a brush size that’s small enough to
fit within the bird’s head. If you start with a brush that’s too
small you’ll find that Photoshop doesn’t expand to the bird’s contour
as well, and may instead just expand to the nearest feather or group of
feathers, requiring more work on your part. The behavior of the
expansion algorithm used by
Photoshop is affected by the brush size, with a larger brush indicating
to Photoshop that the contour it’s looking for is on a correspondingly
larger scale. Once you’ve got the outline of the bird roughly
selected, it’s time to switch to a finer-scale brush and to zoom in a
bit (so that only part of the bird will probably fit on your
screen).
Now you can refine the selection boundary to more closely match the
contour of the bird. When doing this I make frequent use of the option/alt key to
rapidly switch between the add and subtract modes of
the tool, to nudge the selection boundary back and forth until it
precisely follows the bird’s silhouette. When working at the
finest scales
it’s sometimes useful to resort to single clicks of the mouse button,
rather than sweeping with a drag-and-drop type of motion, or at least
to use smaller sweeps rather than continuously “painting” as before. Rest
assured that you’ll get better at it as you gain more experience using
this tool. Just keeping working at it. It’s well worth the effort you put in
now to become more efficent for later.
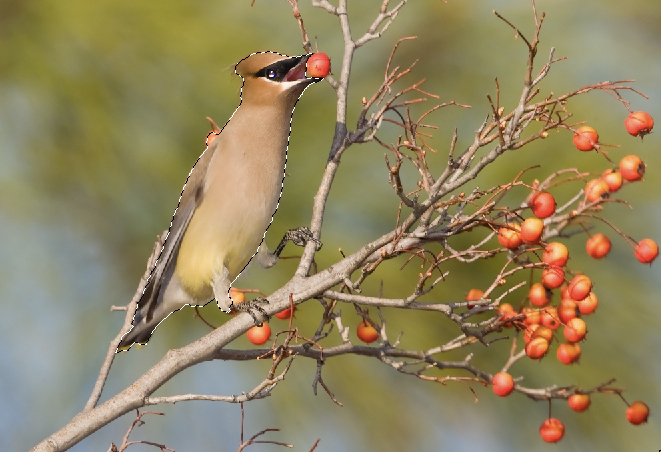
Fig. 10.6.4:
Selecting the bird with the Quick Selection tool. This selection
was made
in about five seconds by sweeping a medium-sized selection brush within
the interior of
the bird. Some additional work remains, however, since a few
parts of the bird remain
unselected, and a few pixels outside the bird (the berry behind it)
have been selected.
These finer-scale adjustments can now be made using a finer-scale
selection brush.
You’ll want to zoom in (using cmd+ or ctrl+) to make those fine-scale
adjustments.
Once you’ve got
the bird selected, it’s a good idea to either save that selection or to
copy the bird to a separate layer (or both). Choosing menu option
Select and then Save Selection allows you to store
this selection under a specified name, so that you can call it up again
later, if needed (via Select >
Load Selection). Alternatively, you can press cmd-J on a
Mac (ctrl-J in Windows) to
automatically create a new layer containing
only the contents of the selection. Each of these two options has
its own advantages. Saving a selection is slightly more
flexible than creating a new layer, because when you call up the
selection later you’re free to modify the selection boundaries if
needed. Also, when saving into a Photoshop file (*.psd), a saved
selection will take up less space than an additional layer.
Layers, on the other hand, have some advantages of their own.
Once you’ve created a separate layer containing the bird, you can apply
other processing filters (e.g., altering the saturation, sharpness, or
contrast) to just that layer; a single click of the mouse then allows
you to turn that layer on or off, thereby allowing you to rapidly
assess the overall effect of the modifications you’ve made to that
layer (relative to the original pixels in the underlying base
layer).
For especially difficult subjects I sometimes resort
to the Quick Mask mode, which
is activated by clicking this icon in the tools palette:

Note that Quick Mask is a mode,
not a tool. Once you’ve
activated this mode, you need to select the Brush Tool, which will now
be set to paint in red (which is why in previous tutorials I’ve
referred to it as the Mask of the
Red Death*). Anything
that you
paint red in Quick Mask mode will be enclosed in a selection when you
transition out of Quick Mask mode (or, depending on how you have the
tool set up, it may be the parts not
painted red that end up being selected—but in that case you can then
invert the selection via Select >
Inverse). The figure below shows a
sloppy attempt to paint a bird red in the Quick Mask mode (note that
the berries are naturally red, and haven’t been selected).
Fig. 10.6.5:
Selecting the bird using the “Mask of the Red
Death” (Quick Mask).
Simply paint the bird with the Brush Tool. If you make a mistake,
switch colors
and unpaint the mistake. When you leave the Quick Mask mode,
everything
you’ve painted red will be selected. The actual color used to
depict the mask, as
well as the behavior of the mask—i.e., whether it is the painted
regions or the
unpainted regions that are selected—can be specified in the Quick Mask
Options window (double-click the Quick Mask icon to show this window).
If you accidentally paint outside
of the bird, you can very quickly fix your mistake by pressing the “X” key (which swaps the foreground
and background painting colors for the current brush) and then
un-painting the area you mistakenly painted; alternatively, you can use
the Undo feature in Photoshop
by pressing ctrl-Z or ctrl-shift-Z.
When the Quick Mask icon is clicked a second time,
the regions that have been painted with the Quick Mask brush will then
be enclosed in a selection boundary, just as if they had been selected
with one of the standard selection tools. The advantage of the
Quick Mask
tool is that it allows you to (more easily) specify what I call fuzzy boundaries. Imagine an
image in which part of the bird fades into the background. The
exact boundary between the bird and the background in that region may
be entirely imperceptible. If you were to arbitrarily impose a
selection boundary where you imagine the contour of the bird to lie in
this region, and then apply some digital processing which makes the
bird stand out more from its background (e.g., making it darker, or
more saturated), the effect in the region of
ambiguity between the bird and its background will often be to produce
an unnatural-looking contour that many viewers will quickly perceive as
an
artifact of digital manipulation. In other words, it won’t look good.
In these cases it’s possible to instead use a
soft-edged (rather than hard-edged) brush in the Quick Mask when
painting the bird red, so that you can effect a smooth selection
gradient in the region of ambiguity between the bird and its
background. When you switch out of Quick Mask mode you’ll see a
selection contour that looks just like any other, but Photoshop will
remember that the selection in the ambiguity region follows a gradient,
and will respect that gradient when applying digital effects to the
selection, and/or when blending a layer created from the selection with
layers beneath it. All you need to do is to modify the Hardness slider in the brush’s
attributes pane so as to achieve the desired fading radius. You
can also modify the Opacity setting for the brush, to achieve a similar
effect; some experimentation with these two settings (Hardness and
Opacity) in the context of a standard paint brush in Photoshop will
give you some intuition for how these work in practice. Yet
another option is to use Select >
Modify > Feather and to choose an appropriate Feather Radius to give you the
degree of fade-out for your selection that you desire.
Note that you can seamlessly switch between
selection
tools. For example, I often begin with the Quick Selection tool,
and then switch into Quick Mask mode to refine the selection.
When you go into Quick Mask, any region that’s currently selected will
appear red (or, depending on your settings, it may be that regions not selected will appear red—or
some other mask color that you have set). After refining the
selection in Quick Mask mode you can leave that mode and then further
tweak the selection using any of the other selection tools. Any
selection tool can be set to the “add” or “subtract” mode to allow modification of the
current selection, so you can switch between selection tools at will
when working on a particular selection.
In your quest
to make the bird stand out from its background, it’s sometimes more
productive to concentrate on modifying the background rather than the bird;
you might therefore want to select the background, or some
part of the background, rather than selecting the bird itself.
When the background consists of a narrow range of colors (a sky, for
example), there’s an easy way to select the background which often
either gives you exactly the selection that you want or something close
enough that you can then modify that selection easily using the tools
described above.
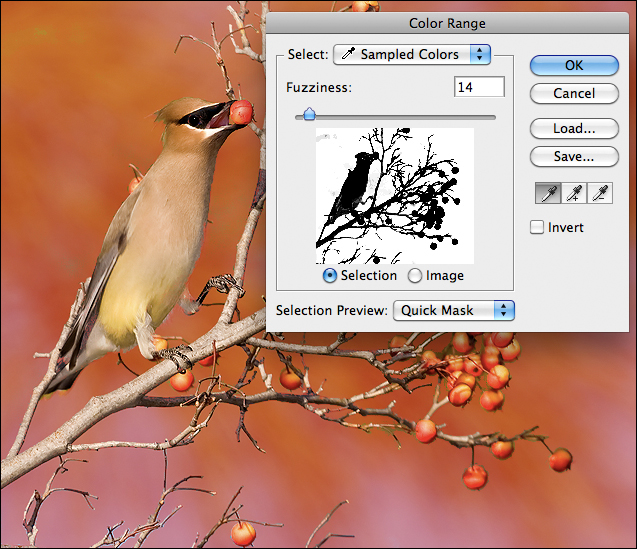
Fig. 10.6.6:
Selecting a color range in an
image. This is often useful for selecting the
background of the image. Remember that
you can always invert a selection via the
menu option: Select > Inverse.
As shown in the figure above, it’s
a simple matter to invoke the Select
> Color Range menu option, which then brings up the Color
Range
dialog box shown below. The first thing you need to do when the
Color Range box appears is to move your mouse cursor out of the Color
Range box and to click it on some part of the visible image that
contains the
color you want to select. As soon as you do so, all pixels in the
image which more-or-less match that color will be selected, and will be
temporarily masked
out in red (or, depending on how you have the brush color or Invert selector set, all the pixels
not of that color
may be masked in red).
Fig. 10.6.7:
Selecting the background via the Color Range tool. The Fuzziness
parameter controls how aggressively Photoshop will include other colors
similar
to the one you’ve selected. By holding the shift key when
clicking on the image you
can add additional colors to those already selected via previous
clicks.
By turning up the Fuzziness
setting you’ll allow Photoshop to also
select pixels that are of a color similar to the one you’ve clicked on,
with the required degree of similarity being indicated by your
Fuzziness setting. Note that you can also hold down the shift key on your keyboard and
click on additional pixels to add to the set of colors that you want to
be selected.
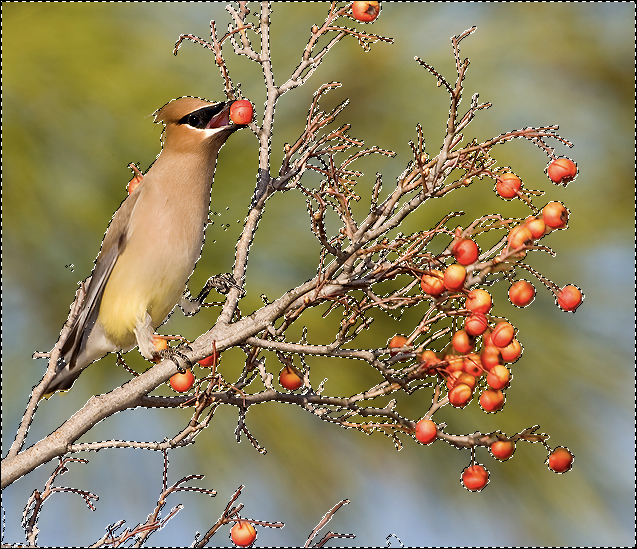
Fig.
10.6.8:
The result of using Color Range. After pressing the OK button,
the Color
Range window goes away, and the masked regions (or their inverse) are
selected. In
the example above, you can imagine how much more difficult it would
have been to
select the given regions manually, using the mouse cursor.
The reason this tool is useful for selecting backgrounds (especially
skies) is that out-of-focus backgrounds often contain a restricted set
of colors, which you can rapidly select via this tool. Once you
press OK in the dialog box (or the enter
key on your keyboard), the red
mask is replaced by a familiar dashed-line selection boundary, as shown
in the figure above. In this particular case you’ll notice that
some parts of the background have been omitted from the selection, and
a few pixels in the bird have been included; this can be quickly
corrected
using the Quick Selection tool or the Quick Mask
mode.
There are a number of other things you can do with
selections that you might occasionally find useful. For example,
the Select > Modify > Expand
and Select > Modify > Contract
options allow you to automatically expand or contract your selection by
a specified number of pixels in the appropriate direction.
Expanding or contracting the selection in this way can be useful in
conjunction with the Feather
feature (Select
> Modify > Feather), since you may want to feather
outward or inward from the selection you’ve already obtained. Yet
another possibility is to convert a selection into a layer mask, which
effectively masks out regions of the current layer so that pixels from
lower layers can show through. Layer masks tend to be wasteful
(in terms of memory use and file size), but often provide much greater
flexibility in terms of being able to make later adjustments.
Layer masks are addressed in greater detail in Chapter 13.
Another use of Expand
and Contract is to rapidly
eliminate large numbers of tiny “holes” in your selection, such as may
occur when selecting via Select >
Color Range. Rather than sweeping these little “holes” out via a selection brush, you
can simply Expand by some
number of pixels and then Contract
by the same number of pixels. This should close up any holes of
sufficiently small diameter, without too drastically altering your
selection otherwise (though it will tend to smooth your selection
boundary). Along a similar vein, beware of tiny “islands” of selection that may remain
after you deselect a region that the Quick
Selection tool incorrectly selected; these little islands of
selection may escape your attention when you’re creating the selection,
but later can become more obvious if drastic exposure adjustments are
made to the selected pixels. Checking for these superfluous
selection islands can be done by (temporarily) creating a layer mask
for the current layer from the selection, and then holding the Option / Alt key while clicking on the mask
with the mouse cursor; this will display the layer mask at high
resolution in the main image area, so you can check for small islands
of black pixels representing selection islands that you don’t
want. Alternatively, you can simply Contract your selections by some
small number of pixels (say, 10) and then Expand by the same number, to
ensure that features smaller than this diameter will be automatically
deselected.
It’s worth keeping in mind that for many
applications you needn’t obtain the most perfect selection that
separates, with 100% accuracy, pixels of the bird from the non-bird
pixels around them. Though sometimes it’s possible to obtain
nearly perfect selections using the Quick
Selection tool, in many other cases you’ll find it requires
rather more work. For images that you intend to print on large
media, it may indeed be worthwhile for you to magnify an image to 100%
zoom and then spend the time painstakingly adjusting the selection
boundary to achieve perfect separation between the bird and non-bird
pixels. For images to be posted on the internet, this is rarely
necessary. Even for images to be printed large, imprecise
selection is often still acceptable, especially if you’ll be feathering
the selection anyway. For bird photographers who take thousands
of images at each outing, imprecise selection during postprocessing is
a matter of practicality. Many of the transformations you’ll
apply to a selected region (such as sharpening or de-noising) can be
done using only quick-and-dirty (i.e., imprecise) selections.
Knowing which selections need to be precise is something that will come
to you with practice (as will knowing how much feathering to apply, and
related decisions). Just keep in mind that when processing the
bird separately from the background you’ll want to make sure that no
part of the selection extends beyond
the actual boundary of the bird.
Note that once you’ve selected part of an image via
the selection tools, you can then apply just about any processing
filter
in Photoshop to just that part of the image. For example, if
after selecting
the bird you then invoke the Hue/Saturation
window, you’ll find that
the
adjustments you make in that window will affect only the bird (or any
other part of the image which is currently selected). As we’ll
see later, this is an extremely powerful and efficient technique for
improving the
aesthetics of an image.
Finally, note that the decision of whether to apply
filters to a selection directly, or to first convert the selection to a
layer, needn’t be an “either-or” proposition. Because
creating and deleting (or merging) layers is so quick and easy in
Photoshop, it’s often convenient to go back and forth between them as
needed. What I typically do is as follows. First, I create
my selection, usually using the Quick
Selection tool. I then save the selection to a named
channel (Select > Save Selection).
The selection stays active after saving it, so I can simply press Cmd-J on my Macintosh to make a
layer out of the selected pixels. The selection goes away at that
point, so the “marching ants” (dashed line indicating the
selection boundary) are gone and will no longer distract me. I
then invoke the desired filter to bring up its parameter window, and
make sure the Preview box is
checked, so that the effects of parameter changes are updated
instantaneously. With the marching ants out of the way, I can
concentrate more easily on the overall aesthetics of the image and how
my impression of the image changes as I move each parameter
slider. Once I’ve finished setting the parameters and have
applied the filter, I then merge the temporary layer back into the
underlying layer that it came from (by right-clicking the mouse on the
layer in the Layers panel and
selecting Merge Down, Merge Layers, or Merge Visible, as
appropriate).
If later I decide the same region needs
additional processing, I can easily call up the same selection via Select > Load Selection and then
proceed according to the same series of steps. By not keeping
these temporary selection layers around indefinitely, I’m both saving
memory and disk space and also keeping the Layers panel uncluttered.
This also avoids the potential for confusion later: keeping too many
layers can complicate further processing, since you need to put more
mental effort into keeping track of which layers are on top of which
others, and which layers you want to select from, when making new
selections. With saved selections, you can re-create a layer for
a selection at any time, as needed.
*If
you double-click the Quick Mask icon you should see a dialog box
containing a number of parameters, one of which allows you to use black
or white as the masking color rather than red; you can also dictate
whether the painted regions, or, alternatively, the unpainted regions,
are to be
selected when transitioning out of Quick Mask mode.
|