|
6.4 Metering Modes
One common point of confusion in
first-time DSLR users is the difference between exposure modes and metering modes. Put quite
simply, exposure is what
happens to
the imaging sensor when a certain amount of light reaches it, while metering involves measuring how
much light is coming in through the
lens (in the case of TTL, or through-the-lens, metering).
Thus, the former deals with how much light we want, while the latter
deals with measuring how much light is available. Once we know
how much light is available, we can set the exposure parameters so as
to ensure that the right amount of light is collected by the imaging
sensor, resulting in an image with the right amount of brightness.
In manual exposure mode, when using a DSLR, we can
effectively ignore the camera’s meter, because we can take a few test
shots and adjust the exposure parameters (aperture, shutter speed, and
ISO) until we like the image seen on the camera’s LCD (or until we like
the resulting histogram).
In the autoexposure modes, however, the
camera needs to utilize its internal TTL meter to determine how to set
the exposure parameters. Because different amounts of light fall
on different parts of the imaging sensor, it matters which part of
the image is used for metering. That’s where the metering modes
come in. Different metering modes simply provide the photographer
with different ways of telling the camera how to perform
metering—that is, how to read the light levels. More
specifically, they allow the photographer to specify which parts of
the image should be used for measuring the light level. For bird
photography, that’ll typically be whichever part of the image contains
the bird. Unfortunately, on most DSLR’s there is no “Bird
Mode”
that would instruct the camera to find the bird in the frame and take
the meter reading from that part of the scene. As such, we have
to make do with the standard metering modes, which are described below.
6.4.1
Evaluative/Matrix
Metering
One of the most popular metering strategies—known to Nikonians as matrix metering and to Canonites as
evaluative metering—is
to
take luminance readings from locations (called “zones”) across the
entire frame, and then to adjust the exposure parameters according to
either a sophisticated computer algorithm or by matching the observed
readings
to a large database of predefined scene patterns, or “profiles”. Because these
algorithms and profile databases have been so extensively tweaked by
the engineers at the camera manufacturers’ labs, they tend to work very
well for a very large number of photographic scenarios.
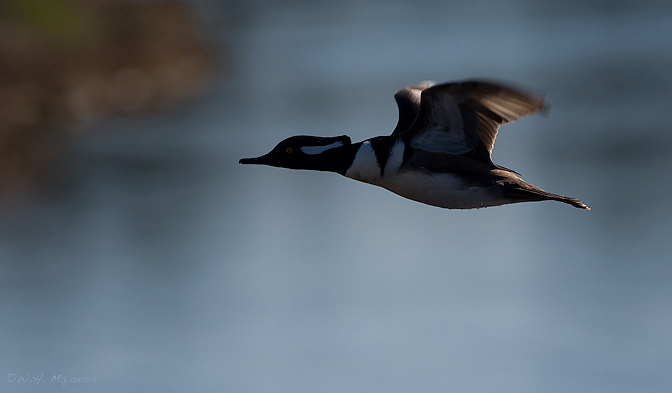
Fig. 6.4.1 :
Back-lit merganser in flight. Av with evaluative/matrix metering
in this case
decided to underexpose the subject (partly due to my setting a -1/3
EC), though enough
detail is present that the result is more than a silhouette but less
than an ideal subject
exposure. Yet somehow I like it. Sometimes the
idiosyncrasies of obtuse camera
modes can be the engines of novelty. (1/1000 sec, f/6.3, ISO 100,
400mm, Av with
-1/3 EC, evaluative metering, no flash)
One problem with evaluative/matrix metering modes
for bird photography is that in challenging lighting situations you
often have to overexpose or underexpose the rest of the scene in order
to properly expose the bird. If, for example, the bird is perched
in a shady foreground surmounted by a large, bright background (or if
the bird is back-lit, meaning
that the bird is between the camera and
the sun), then under some evaluative/matrix metering modes,
autoexposure will result in a bird that is too dark (unless you’ve
dialed in a large exposure
compensation value).
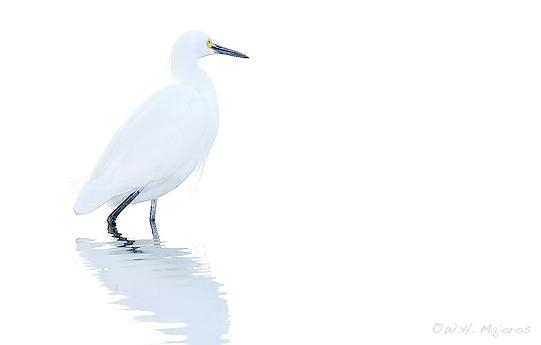
Fig. 6.4.2 :
Polar bear in a snow storm (or maybe it’s a snowy egret in blinding
backlight?). This is another example of a “high-key” image, which
some people
like and some don’t. Evaluative/matrix metering would probably
(depending on
the camera model) try to render this whole image in a neutral gray, and
although
you could adjust the brightness upwards in postprocess to achieve the
high-key
effect, you can get lower noise and more detail by exposing for
high-key at the outset.
(1/320 sec, f/8, ISO 1250, 600mm, manual mode, TTL flash at +1 FEC).
Note, however, that some evaluative/matrix metering modes can work
well for back-lit subjects, as long as the subject is large enough in
the frame to be detected by the metering mode’s algorithm.
Because the implementation of these modes differs between camera
manufacturers (and even between different models produced by a single
manufacturer), some experimentation will be required to find out how
well this mode works for you. Note also that on some cameras the
evaluative/matrix metering mode will assign greater importance to the
metering zone containing the active autofocus point (see section 6.7
for a discussion of AF points); if your camera happens to be one of
these, then evaluative/matrix metering may indeed work well in those
cases where you’ve got the bird positioned right at the active AF
point—that is, as long as you’re not using the focus-and-recompose
technique (discussed below).
Although there are some very successful bird
photographers who strongly prefer evaluative/matrix metering, the more
popular option among wildlife photographers seems to be spot
metering, which is described next.
6.4.2
Center-weighted and
Spot Metering
For photographic applications in which there’s an explicit subject in
the scene (such as a bird), or simply for those photographers who like
to have greater control over metering, many SLR cameras allow meter
readings to be taken from a small area of the scene—typically from
the center, though sometimes also from other locations. This is
generally known as spot metering.
The spot in question (where
metering takes place) is typically on the order of 2% to 5% of the size
of
the visible frame, though it can range up to around 15% on some
models. On low-end cameras the spot is often limited to a single,
central location, and may be indicated by a faint circle depicted in
the viewfinder (though the metering sensor may in fact be larger or
smaller than this circle suggests). On many higher-end models,
the spot used for metering is co-located with the autofocus sensors,
and on some of these models you can tell the camera whether you do
indeed want the metering to be linked
to the active AF point, or to
always default to the center spot. As noted above, some models
provide a mode that behaves like evaluative/matrix metering but
attaches greater importance to the zone containing the active AF point,
resulting in a sort of hybrid matrix/spot metering mode.
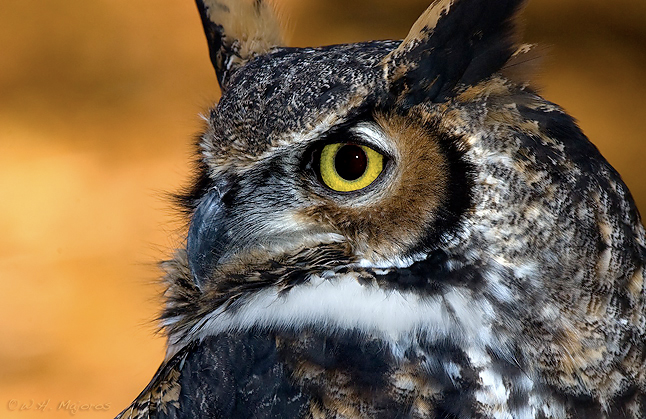 Fig.
6.4.4 : Great-horned owl at sunrise. Spot metering would have a
field day with
Fig.
6.4.4 : Great-horned owl at sunrise. Spot metering would have a
field day with
this subject, as the bird’s plumage ranges from bright white to dark
black. Being unsure
of the actual size of the spot meter sensor, you can’t count on it
singling out exactly the
plumage feature that you point it at. And remember that the spot
meter wants a neutral
gray, whereas in this case you’d want to make sure that the brightest
areas of the bird
aren’t overexposed. (1/125 sec, f/10, ISO 320, 600mm, Av with -1
2/3 EC, evaluative
metering, TTL flash at -2 FEC)
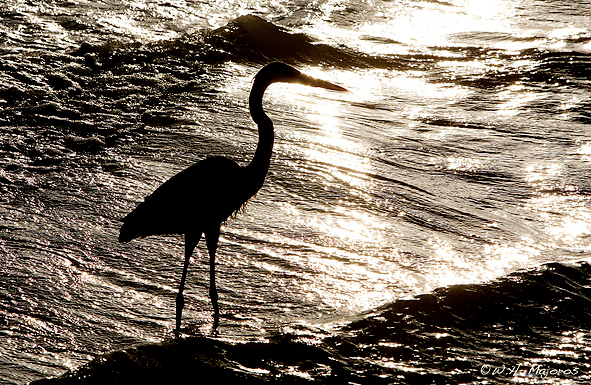
Fig. 6.4.5 :
Silhouettes can be harder to expose than you might think. In this
case I wanted to retain quite a lot of background detail (i.e., the
ripples in the
water), while also allowing some blown highlights to emphasize the
reflection
of the sun. Spot metering would have been very difficult to use
in this black-
and white milieu. (1/1600 sec, f/11, ISO 320, 200mm, manual mode, no
flash)
One alternative
to spot metering is center-weighted
metering, in which a large,
central region of the frame is used to collect a majority of the
metering information, while the rest of the frame still contributes
some information. Some people find this a reasonable compromise
between spot metering and evaluative/matrix metering, though how well
it will work for you in practice will depend both on the types of birds
you tend to shoot (i.e., whether large or small, and how close you
typically get to them) and on how your particular camera implements the
center weighting—i.e., how large the metering sensor is, and how the
relative importance is distributed between the central sensor and the
other zones spanning the frame.
No matter which metering mode you choose, if that
mode gives higher weight to any individual spots, and if you’re using
auto-exposure (as opposed to manual exposure), then you need to be
aware of the auto-exposure lock
function, or AEL. This is
especially important for the method of focus-and-recompose, which
will be described in detail in section 6.7.
Briefly, recomposing
involves taking a focus reading from the bird and then shifting the
camera’s angle so as to place the bird elsewhere in the frame, for
aesthetic purposes (since you probably don’t want the bird to be
in the exact center for all your photos). The trick is to make
sure that the meter reading is locked in place at the same time that
the focus is locked; otherwise, after repositioning the bird in frame,
the final meter reading may not reflect the brightness of the
bird. On many cameras you can lock the meter reading by pressing
the AEL button (labeled “*” on some bodies). Your
camera’s
intruction manual should tell you whether you need to hold down the AEL
button or if pressing it just once is enough, and also what happens if
you press the button multiple times; some high-end cameras allow
multiple readings to be taken from different parts of the scene, and
averaged together.
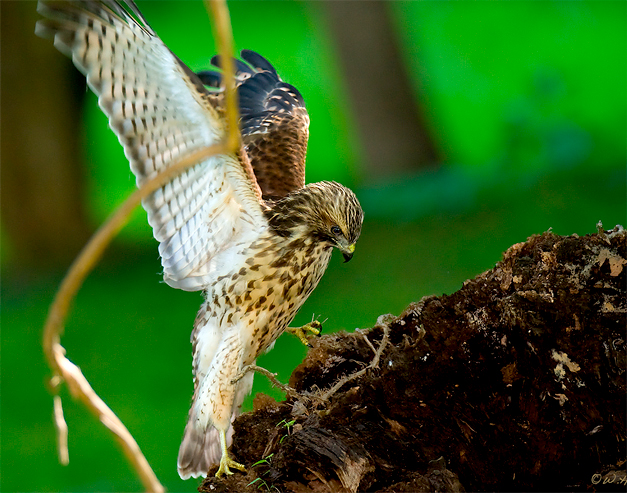
Fig. 6.4.6 :
The enormous dynamic range of bird plumages presents a significant
challenge
to any automated metering/exposure mode. In this case I wanted to
make sure I could
retain some detail in the white flashing of the underwing. By
setting exposure parameters
manually, I was able to eliminate the shot-to-shot variation that tends
to otherwise occur with
automatic metering/exposure modes in action shots. (1/320 sec, f/4, ISO
1000, 600mm,
manual mode, manual flash at 1/4 power)
6.4.3
Metering in Manual
Mode
Although the camera’s meter has no direct effect on the exposure
parameters in manual mode, its reading is still available to the
photographer if s/he wants to consult it. Inside the viewfinder
you’ll see a bar with regular intervals marked along its length.
This is the meter bar.
The zero position of the bar (halfway
along its length) represents a “neutral” light level—the so-called 18% gray level, which historically
was a good reading for film
photography. If the depicted reading is above this midpoint, then
the camera believes the scene will be overexposed, and vice-versa for
readings below the midpoint. To the extent that you have faith in
your camera’s meter, you may wish to adjust the exposure parameters so
as to get the reading as close to neural zero as possible.
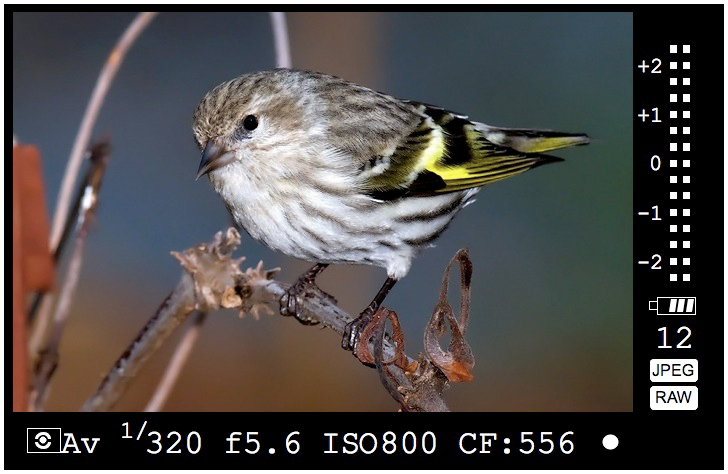
Fig. 6.4.7 :
Typical representation of a meter bar in the viewfinder. The meter
bar, shown at right in this illustration, predicts exposure levels both
with and
without flash. Exposure compensation (EC), and flash exposure
compensation
(FEC) affect the predicted readings of the meter bar. In
traditional meter-based
photography, the goal is (in general) to center the live readings of
the meter at the
zero level, which represents a Pleasant Shade of Gray. (Shown
settings are artificial).
Personally, I ignore the meter altogether, except
when trying to get an initial starting point for my exposure parameters
at the start of a shoot. To quote an experienced bird
photographer I met once in Maryland, “The meter is the stupidest part
of your camera; just ignore it.” Given the much more
information-rich histogram and highlight-alert features offered by
modern DSLR’s, I don’t think that statement is terribly off the
mark. I make the vast majority my exposure decisions based on the
highlight alerts that show during image playback on my camera’s LCD;
this is in keeping with the ETTR philosophy outlined earlier in section
6.2. More generally, it’s
possible to make exposure decisions
based solely on the histogram (nearly all DSLR’s can be set up to
diplay an image histogram after each shot, rather than displaying the
image itself). Just keep in mind that the histogram reflects the
overall light level throughout the scene, whereas a spot meter can
measure light at just one point (which is useful if that point is
co-located with the bird, and is a convenient size). On the other
hand, the highlight alert function is, in effect, a dense array of
thousands of spot meters calibrated to the upper end of representable
light levels, rather than to neutral gray. In this way, we can
view the highlight alert function as the natural evolution of spot
metering for digital cameras (at least in manual mode). It’s
conceivable that some
combination of histogramming and highlight alerts might be developed in
the future, perhaps via Live View
(see section 6.11), making the
traditional fixed-zone metering system that much less useful for the
advanced bird photographer.
At this point it’s useful to note once again that
all of the auto-exposure modes described in the previous section allow
a manual override of sorts via exposure
compensation (EC).
Though I now shoot exclusively in manual mode, I previously used Av
(aperture priority) and found that the meter reading of my camera (a
Canon 30D at the time) was consistently off by about 2/3 of a
stop. That is, I found that by dialing in an EC value of -2/3 I
was able to get better exposures in Av mode on that particular camera
model. Different camera models have different biases in this
regard. During metering (regardless of metering mode or
autoexposure mode), if you watch the meter reading in the viewfinder
while turning the EC dial, you should see the reading go up and down as
you vary the EC. What you’re doing is telling the autoexposure
system to aim higher or lower in its notion of what is an “ideal”
exposure.
While shooting birds in Av I found that I was
constantly adjusting my EC value up and down by a few clicks (each
click on my camera is a third of a stop; on other cameras it may be a
half or even a full stop per click—remember that a stop of light corresponds to a
doubling/halving of the shutter speed or ISO, or multiplying/dividing
the f-number by 1.4).
Once you find yourself doing
this you should consider switching to full manual mode. In manual
mode you can choose which of the three exposure parameters (aperture,
shutter speed, ISO) to modify, whereas in the autoexposure modes your
EC settings affect just one of the parameters. Also, in the
autoexposure modes, the “baseline” reading that the EC value adjusts
can vary as you follow a bird between sunny and shady locations;
although this can be useful when relying entirely on ambient light, for
flash photography it can be more of a hindrance than an aid.
Flash photography is addressed in the next chapter.
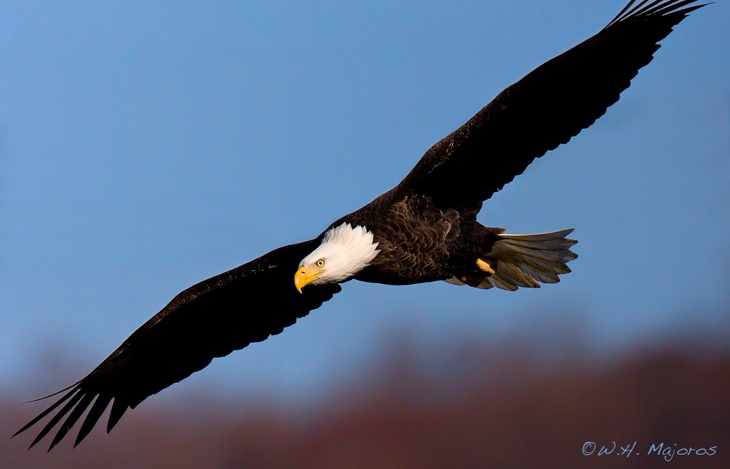
Fig. 6.4.8
Eagle on the horizon. When your subject has the potential to
repeatedly move
above and below the horizon, the overall brightness of the background
can change drastically,
sometimes confusing the meter and autoexposure system. By instead
using manual mode,
you can find a good exposure for your bird that works for any
background, and then
stick to those settings. Note also that in this photo the
underwings had to be underexposed
in order to retain detail in the head. This is an extreme case of
ETTR applied to just the
bird’s head. In this case I was using Av with evaluative
metering, so I was lucky that
the highlights in the head weren’t blown. (1/6400 sec, f/8, ISO
800, 840mm, Av -2/3 EC)
|
|
|