|
6.3 Exposure Modes
If you’re just starting out with
your first DSLR, a good first step is to spend some time shooting in fully automatic mode. For
many DLSR’s, you can get into this
mode by turning the dial atop the camera to the green box (if there is
one). In this mode, the camera makes all the decisions about the
exposure parameters for you: all you have to do is point the camera at
the bird and push the shutter release button when the bird strikes a
nice pose. On bright, sunny days, this can work just fine.
On dark, dreary days (or in a thick forest) with a not-so-wide lens
(say, f/5.6 or slower) the
camera may be forced to choose extreme
parameter values, such as a very high ISO (which might result in a
noisy image) or a very slow shutter speed (which often results in image
blur).
The problem with fully automatic mode is that you
can’t tell the camera which of these potential problems you
prefer—i.e., whether you consider noise or image blur (or
deep/shallow DOF) to be the “lesser of two evils”. Fortunately,
there are other exposure modes that allow you to delegate some of the
decision-making to the camera, while retaining some control for
yourself. We’ll consider these in turn.
6.3.1
Aperture Priority
The most popular exposure mode among bird photographers seems to be aperture priority mode, which we’ll
abbreviate as Av (for
historical reasons). In Av, you can set the ISO and the aperture
yourself, but the camera chooses the shutter speed for you (though
we’ll see in a moment how you can adjust it indirectly). A
practical methodology for using Av is as follows. Suppose that
you know that your camera tends to perform well (in terms of noise
characteristics) up to about ISO 400. You can then set the ISO to
this value, and then set your aperture to its maximal setting, which
for many intermetiate birding lenses will be f/5.6. Having done
this, you can then point the camera at a bird, press the shutter
release button halfway, and observe (from the digital readout inside
the viewfinder) what shutter speed the camera chooses. As long as
it’s not too slow (say, at least 1/160 sec for stationary subjects, or
1/800 for birds in flight), you can then proceed to shoot. As
long as the exposures look fine as they appear on the camera’s LCD, you
can forget about the parameter settings and concentrate on taking
pictures.
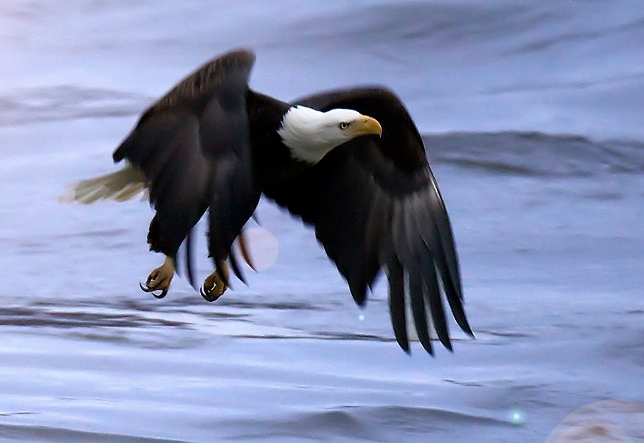
Fig. 6.3.1 :
Eagle with slight blurring. Even though this photo was taken in
manual mode
rather than Av, it illustrates something important about all exposure
modes: that in the field
it’s easy to come up against the practical limits of any and all
exposure parameters. In this
case, the aperture was wide open and the ISO was at the highest native
setting for the camera,
so I had to accept a shutter speed that was too slow for freezing the
motion of this bird in flight.
In challenging shooting scenarios you often have to compromise in order
to get a proper exposure.
(1/400, f/4, ISO 1600, 600mm, manual mode, TTL flash at +3 FEC)
If the exposure
levels chosen by the camera under Av don’t
look good, then you need
to employ a fourth exposure parameter, called exposure compenstation,
or EC. When in Av mode, many cameras automatically assign one of
the camera’s control dials to EC, to make it easier for you to make
rapid adjustments to it. The EC parameter simply allows you to
tell the camera that you’d like the images to be brighter, or darker,
than how they’re currently turning out. The camera achieves this
by making additional adjustments to the shutter speed. As long as
the shutter speed doesn’t hit a limit—i.e., too fast or too
slow—you can continue shooting without having to change any of the
parameters, except possibly for an occasional minor adjustment to the
EC.
At this point you may be wondering how the camera
chooses the shutter speed in the first place—especially if you
haven’t even registered an EC value yet, to tell the camera that the
image is too bright or too dark. The short answer is that the
camera has a set of metering sensors
which it uses to measure the
amount of light entering the camera through the lens, and it uses a
simple formula (which we’ll omit here) which combines the ISO setting,
the aperture setting, and this light measure from its metering sensors,
to determine which shutter speed will result in an overall image
brightness that doesn’t fall outside a predefined range of
values. In registering an EC value, you’re effectively shifting
this predefined range of values to the left or to the right, to force
the camera to prefer a brighter or darker exposure than it normally
would. Metering is discussed in greater detail in section 6.4.
Mode
|
You
set...
|
Camera
sets...
|
aperture
priority
(Av)
|
aperture
|
shutter
speed
|
shutter
priority (Tv)
|
shutter
speed
|
aperture
|
program
(P)
|
|
shutter
speed and
aperture
|
manual
(M)
|
shutter
speed and
aperture
|
|
Table 6.3.1 :
Exposure modes. All of these modes allow you to choose an ISO
setting.
When shooting in dim environments, if your ISO is
limited and your lens isn’t ultra-wide (say, f/2.8 or wider), the
camera will often be forced to choose shutter speeds that are simply
too slow for moving subjects. At this point, you have several
options. First, you can employ flash
(see Chapter 7).
This assumes that the bird is close enough for the flash to reach
it. Another option is to adjust the EC value, and to accept that
the image is going to be dimmer than you’d like (though hopefully the
resulting gain in shutter speed will at least reduce image blur).
Or you can increase the ISO and accept that you’re going to have to
apply some aggressive noise-removal procedures in postprocess.
While none of those options may sound particularly
attractive, it might be that they’re only necessary for some of the
shots in the current shooting session. As the sun moves in and
out of the clouds, and as the bird moves in and out of the shade, you
may find that the camera is sometimes able to use a fast enough shutter
speed, while at other times you need to adjust one of the other
parameters in order to force the camera to choose a faster shutter
speed. If the bird is moving only sporadically, and if your lens
or camera has image stabilization,
you might get away with just letting
the camera use those slower shutter speeds occasionally; you might get
lucky with some of those slower shots and get an acceptably sharp
image. If you’ve got an extremely wide lens (say, f/2.8), or if
your camera has exceptionally good noise characteristics at high ISO’s,
you might find it more convenient to use shutter priority mode, which
we discuss next.
6.3.2
Shutter Priority
Whereas in Av the camera sets the shutter speed based on your chosen
ISO and aperture settings, in shutter
priority mode (denoted Tv,
for
historical reasons), the camera instead sets the aperture, based on
your chosen settings for the shutter speed and ISO. As noted
above, this can be convenient when shooting in dim lighting, as long as
you’ve got a wide lens or your camera can handle high ISO settings
without generating too much image noise. In Tv mode you’d simply
set the shutter speed to the slowest value that still freezes the bird,
set the ISO to the highest value that doesn’t produce too much noise,
and then set the EC to a value that produces acceptably bright images
under these settings. The camera will adjust the aperture so as
to achieve a consistent exposure, which is fine as long as it doesn’t
run up against the maximum aperture for the lens you’re using.
When that happens, the camera will typically indicate a potential
underexposure condition via some sort of flashing indicator in the
viewfinder, which you can then rectify by increasing the ISO. If
you can assign ISO to one of the control dials and keep your thumb on
that dial during shooting, you should be able to, with practice, ensure
that underexposure doesn’t happen. Since you’ve fixed the shutter
speed at a value high enough to freeze the bird, the images should also
be sharp. The main problems with this scenario are the use of a
high ISO value (which may result in unacceptable noise levels) and the
potential for you to overlook the camera’s underexposure indicator,
potentially resulting in images that are unacceptably dark. Note
that for bird photography Tv is most useful in dim shooting
environments; in bright environments, the camera may have to stop down
the aperture to an extremely small value (f/32 or smaller) to avoid
overexposure. At these small apertures your image may suffer from
diffraction
effects, which can reduce sharpness, or may have an
unpleasantly large DOF. Many lenses won’t stop down further than f/32.
Some of the more recent DSLR’s on the market today
feature a mode called auto ISO,
in which the camera will choose an
ISO setting automatically, much like the way it chooses the shutter
speed in Av or the aperture in Tv. In theory, this should allow
the photographer to set a fixed shutter speed (i.e., high enough to
limit motion blur) and a fixed aperture (which would probably be the
maximal value when shooting in dim environments), and to allow the
camera to choose an ISO setting that maintains a consistent
exposure. Unfortunately, early implementations of this feature,
at least by some manufacturers (such as Canon), have been rather
restricted in their usefulness. Hopefully, this will change as
the idea of ISO as a full-fledged exposure parameter, on par with
shutter speed and aperture, becomes more established.
6.3.3
Manual Mode
Manual mode works just like the name implies: the photographer must set
all of the exposure parameters manually. As mentioned earlier,
this is often not as difficult as it sounds, since in many birding
environments you’ll find that only minor adjustments are required from
shot to shot, so that once you’ve found a good set of initial
parameters, the amount of work necessary to maintain good exposure
isn’t excessive. And indeed, in dim environments, users of Av
(aperture priority mode) may have roughly the same amount of work to do
to keep the shutter speed from falling to an unacceptably slow
setting. When light is plentiful, Av can indeed be much easier to
manage than manual mode (sometimes).
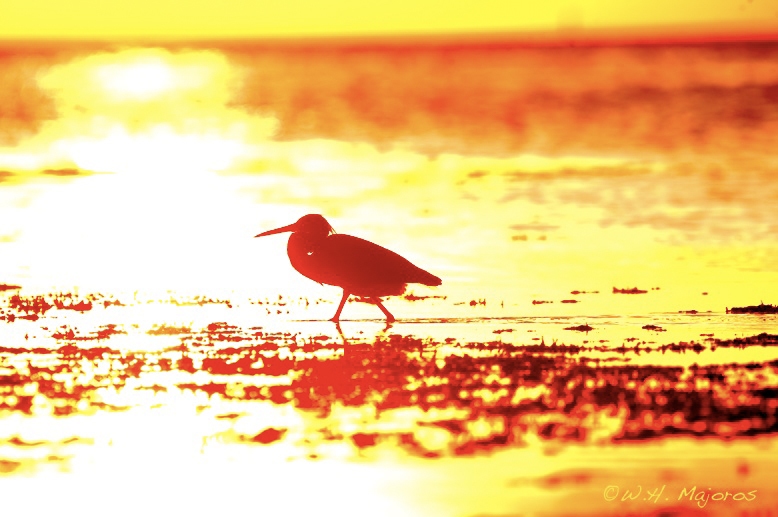
Fig. 6.3.2 :
Back-lit situations are always difficult, but when you’re shooting
directly into the sun
there’s little hope for anything except silhouette shots. Even in
a silhouette shot it’s good to try to
get some nice color gradients if possible, especially for sunset
shots. This shot could have been
better, but I’m happy with what I got. (1/800 sec, f/6.3, ISO 400,
400mm, manual mode, no flash)
There is at least one situation in which manual mode
is superior to the others. When shooting birds all having very
similar plumages (e.g., all having lots of white feathers, for example)
and all staying in roughly equal lighting conditions (i.e., all out in
the sun, or all in the shade), then an attractive approach is to find
the optimal setting for all three of the exposure parameters and then
leave them fixed (in manual mode). Without large differences in
plumage or lighting, the desired exposure values won’t change much from
shot to shot, and if you’re following an ETTR philosophy, you’ll just
want all of the exposures to be close to the maximal brightness anyway
(without blowing any highlights).
If you were to use Av or Tv in such a situation,
you’d probably be fine as long as the birds aren’t moving around much,
so that their backgrounds are fairly consistent and their distance from
the lens isn’t changing appreciably. If either of these
conditions
aren’t met, then Av and Tv modes can end up introducing too much
variation into the exposure of the bird. To explain why this is
so, we need to first discuss metering
modes, which we’ll do in the next
section.
|
|
|
