|
Chapter
15
Making
a Slideshow DVD
A simple but sometimes
highly effective way to distribute your bird photos is via a slideshow DVD—i.e., a standard
movie DVD that plays a slideshow of your photos (ideally accompanied by
music) when inserted into a standard DVD player. Making a
slideshow DVD can be very simple, given the right software. Once
you’ve made a master DVD, you
can then duplicate and package it to
produce a final product that can be sold to the general public or given
away either as promotional tools or as presents to friends and
relatives.
15.1 Software
for DVD Production
Making the actual slideshow is
generally quite simple, given the right software. On Apple
Macintosh systems,
the iMovie and iDVD programs that come bundled for
free with the operating
system provide all the functionality you need to design your DVD;
similar software is available for Microsoft Windows systems.
On the Mac, the iMovie
application will let you create the individual slideshows that you’ll
later assemble into a complete DVD
programme. The figure below illustrates the process of creating a
single slideshow in iMovie.
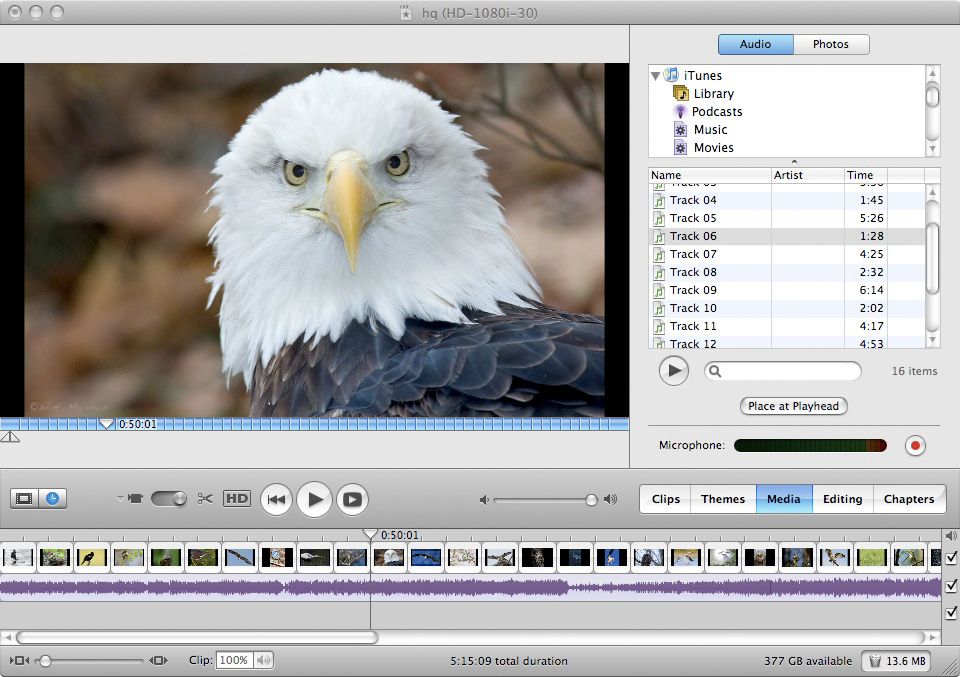
Fig. 15.1.1 :
Creating a photo slideshow in iMovie (on the Mac).
At the bottom are the photos making up the slideshow, and below
these is the audio track that plays during the slideshow. Photos
can
be re-ordered via drag-and-drop. The MPEG file generated by the
software can then be incorporated into a DVD programme, or can be
uploaded to video sites such as YouTube.
In the above figure, the two
tracks near the bottom of the window show the series of photos making
up the slideshow and the audio track (i.e., music) set to accompany the
slideshow when it plays. Adding photos to the slideshow is as
simple as dragging and dropping them from a folder on your computer,
using the computer’s mouse. Similarly, you can drag an audio file
(e.g., an mp3 file) into the
audio track from a folder on your
computer. If you set up the audio track first, then you can just
keep adding photos to the slideshow until the length of the slideshow
matches the length of the audio track in iMovie (so there won’t be any
leftover slides at the end with no music). Though it’s possible to change the duration
of each slide, I recommend sticking with the default of three seconds
per slide.
Once you’ve got the right number of photos in the
slideshow, you can change the ordering by dragging them back and
forth in the series. You can preview the slideshow with the audio
enabled, to see how well the music matches the progression of
images. Once
you’ve got the ordering you want, you can save the slideshow to an MPEG
file which can then be read in by the DVD mastering software.
Note that some programs provide various special
effects, such as fancy transitions between photos (e.g., having
one
photo fade or morph seamlessly into the next, or creating a
page-turning effect
or the like). I’ve found these to work poorly for standard movie
DVD’s (i.e., not HD-DVD's or Blu-ray disks), possibly due to image
resolution
issues. Although the transitions look quite impressive when
previewed in
the software, after burning the DVD and playing it on my television,
the images end up looking terrible; for this reason, I avoid using
transitions and other special effects.
Once you’ve made one or more more slideshows and
saved them into separate MPEG files, you can import them into your
favorite DVD mastering
software to create a DVD programme. The
figure below illustrates the iDVD
program that comes pre-installed on
many Apple Macintosh systems. It allows you to create a title
screen with images and
text and a continuously-looping soundtrack. You can then add your
slideshows to this main menu.
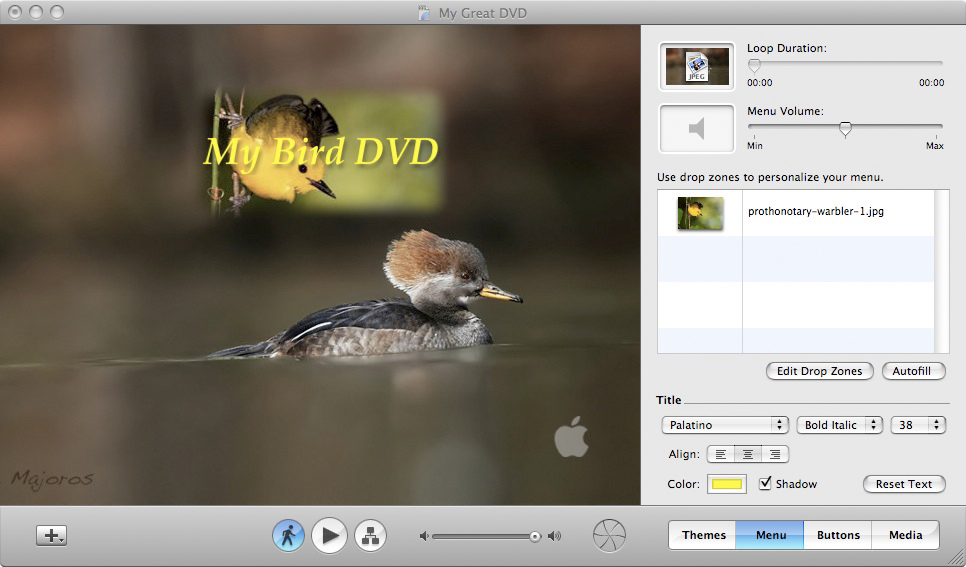
Fig. 15.1.2 :
Editing the title page in iDVD. The “+” button in the
lower left
corner
of the window allows you to create sub-menus or to add slideshow
movies. The page
can have music accompaniment that continuously loops. Text of any
color and font can
be added. Once you've finished the design, the software burns
your master DVD. The
master can then be
sent to a duplication company to make fully packaged copies for
sale to the public.
As one example, the figure below
shows a screen capture of a slideshow
DVD I made several years ago. The series of images in the middle
of the screen continuously scroll from right to left, while some
background music is played. The menu items below this can
be selected in the usual way using the DVD player’s remote control;
each of these causes a separate photo slideshow (each set to different
music) to play when selected.
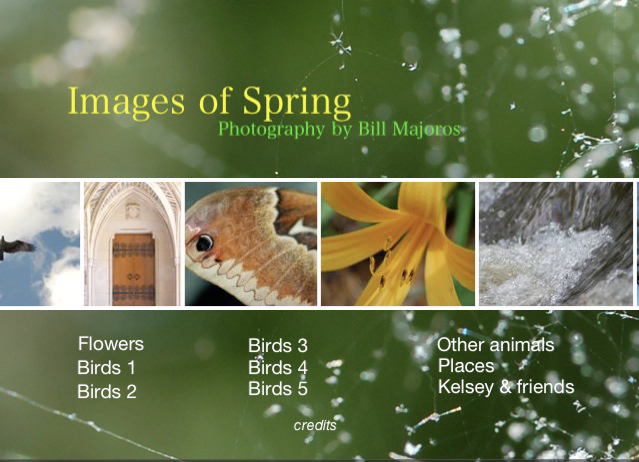
Fig. 15.1.3 :
The title screen of my very first slideshow DVD (2007).
The “film cells” in the middle
scroll horizontally while music plays.
The nine titles shown below this are the slideshows that the user can
select with the DVD remote control.
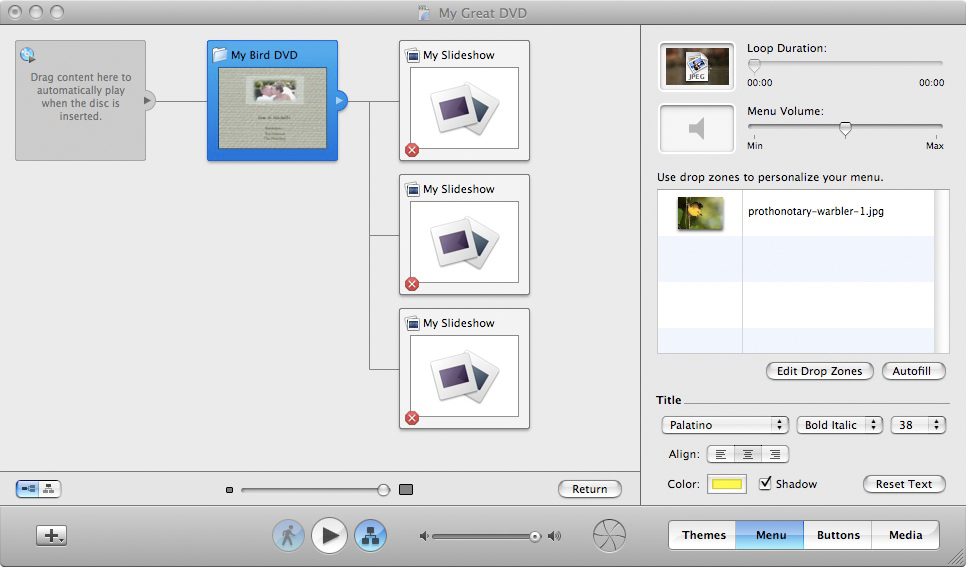
The figure below shows a DVD programme, or “schema”, in a hierarchical
representation; the blue square represents
the main menu page, and the three white squares to its right are
slideshows that have been added. Note that you can create
sub-menus below the main menu, and these sub-menus can then have
slideshows embedded in them. You can even make a “credits” page
that displays your copyright notice and gives credit(s) for the
soundtrack. Most DVD authoring programs provide a number of
templates that you can select from, to make it easier to find a layout
that you like; the scrolling image bar in the menu shown above was
created using a predefined template (though I replaced the images in
the template with my own photos).
Fig. 15.1.4 :
Hierarchical schema for a DVD programme. The blue box represents
the top-level menu. The white boxes represent slideshows that can
be played from
the top-level menu. Sub-menus can also be created (not shown),
and can be embedded
to any depth (within reason). Slideshows can be created directly
in iDVD, or
externally
in iMovie or some other application. Other DVD authoring programs
are available
with the same (or equivalent) features.
15.2 Image
Quality
One limitation of slideshow DVD’s
is their image quality. Standard DVD’s (i.e., not high-definition DVD’s such as Blu-ray or HD-DVD) are limited to a maximum
resolution of either 720×480 pixels (in the NTSC format used in the U.S. and
some other countries) or 720×576 pixels (in the PAL
format used in Europe and some other places). To illustrate how
small
these dimensions are, the figure below is 720×480 .
Fig. 15.1.5 :
An image scaled to exactly 720×480. This
may appear sharp in the web
browser on your small laptop screen, but when blown up to fill a
40-inch television
the fine details may not appear quite so impressive. This is why
high-definition video
was introduced. Unfortunately, not all of your potential
customers
will have an HDTV.
This image may fit nicely in your web browser, but considering that
many televisions these days are much larger than the average laptop
computer
screen, you can imagine that scaling up this image (without adding any
additional pixel information) could substantially degrade the perceived
sharpness.
One solution is to use a high-definition format such
as Blu-ray or HD-DVD. These latter formats
can support images as
large as 1920×1080 pixels, which is larger than
what can be displayed
on most laptop computer screens. The problem with HD format disks
is that they take more time to burn, they require that your computer
has a disk burner capable of burning that format, and many HD players
will only accept one format or the other (i.e., only Blu-ray, or only HD-DVD).
Also, many people who might want to view your DVD won’t
have an HDTV or HD disk player (of either type).
15.3 Obtaining
Royalty-free Music
If you intend to make copies of
your DVD to sell to the public, you need to make sure that you don’t
violate any copyrights when selecting music to accompany your
slideshow. Unless you happen to be a musician (like me) or know a
musician
who will let you use his/her music for your DVD, avoiding copyright
issues can be difficult. Fortunately, there are a growing number
of web sites that list royalty-free, public-domain audio files that you
can use in your project. Several of these are reviewed
below.
In all cases, however, it’s up to you to ensure that anything you
download is truly royalty-free and/or in the public-domain; just
because you find a link to an audio file on some web page that claims
the file is in the public-domain doesn’t mean that it necessarily is
so.
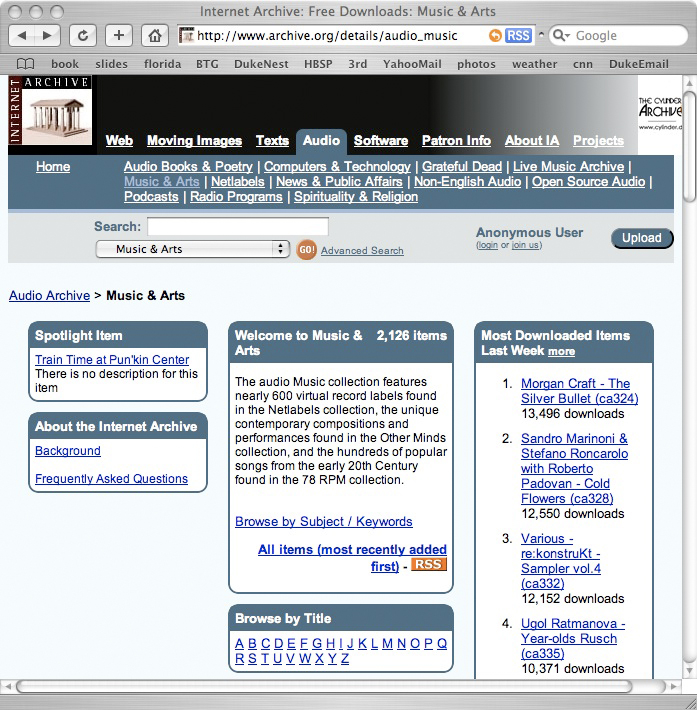
Fig. 15.1.6 :
One of several audio directories in the Internet Archive.
Obtaining royalty-free music for use in slideshow DVD’s can be a
challenge,
but sites such as this can make the task somewhat easier. Always
be careful
to read the fine print for any entry you're thinking of using, to make
sure the
licensing terms are agreeable.
A good place to start your search
for royalty-free music is at the Internet
Archive, which is shown in
the figure above. This site indexes literally hundreds of
thousands of audio files, though not all are music, and not all are
royalty-free.
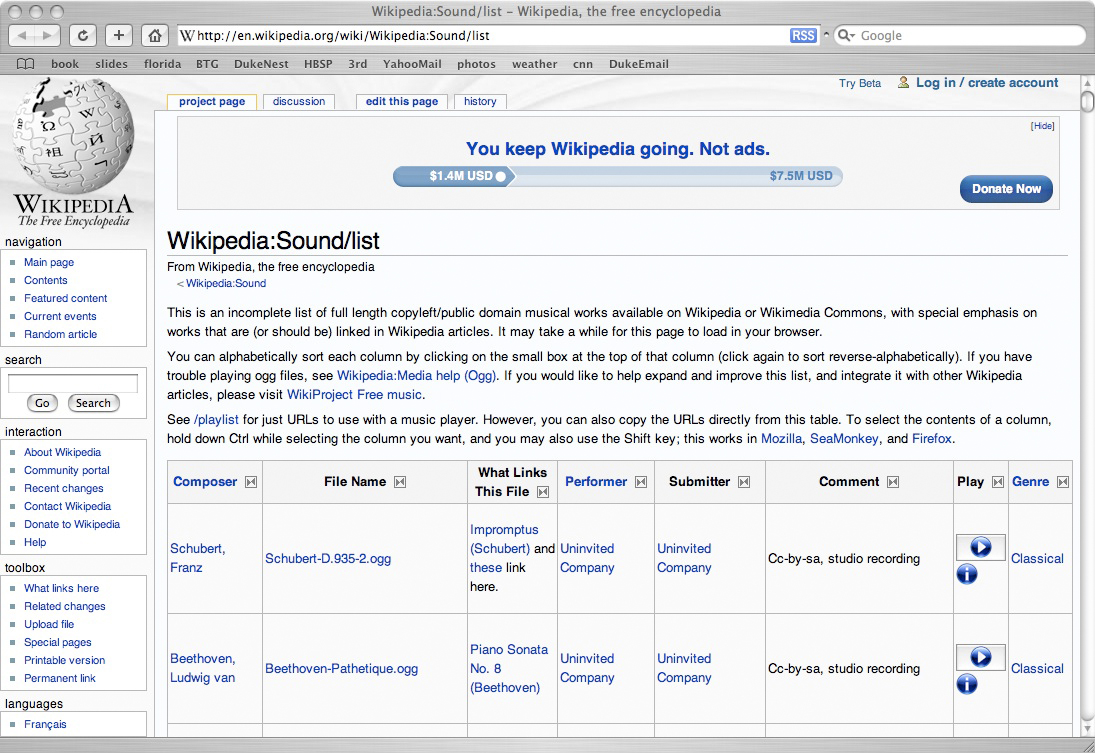
Another promising resource is the Wikipedia:Sound/list
page, which is shown in the figure below.
All of the music linked on this page is purported to either reside in
the
public-domain, or to have a copyleft
license (which means that some uses are allowed, while others may be
prohibited). Whereas
public domain works are copyright-free, copyleft works carry some licensing
terms that must be observed; in some cases, these will permit
commercial use as long as the original artist is acknowedged, while in
other cases it may permit nonprofit use but prohibit commercial
use. It’s up to you to read the fine print and figure out whether
a given file can be used in your project.
Fig. 15.1.7 :
Wikipedia’s list of royalty-free music.
15.4 DVD
Duplication and Packaging
Once you’ve designed your DVD
using Apple’s iDVD or a similar program, you then
need to find a solution for
duplicating and packaging your DVD’s. If you’re only planning to
distribute a small number of them, you can simply burn copies on your
home computer; for larger numbers you’ll want to have them manufactured
by a
short-run duplication service such as CreateSpace.com.
Most disk duplication companies can also print full-color cases for
your DVD’s, and will assemble the units and possibly even shrink-wrap
them as well.
Keep in mind that even if you have a few hundred
disks made up by a commercial company, the DVD’s will likely be of the burned variety (ie., DVD-R or DVD+R),
rather than the pressed
kind. Burned disks are made by burning a pattern into the layer
of dye that was embedded in the disk when it was manufactured, using a
fine laser; pressed disks are
instead made by mechanically pressing a pattern into
a thin aluminum sheet that is then embedded into the disk during
assembly. Pressed disks tend to last far longer than burned
disks, because the dye in burned disks is light-sensitive, and will
naturally degrade over time. I’ve seen DVD+-R’s become unreadable
in just two years’ time, though I would hope that at
least some last longer than this.
When designing the packaging for your DVD project,
be sure you follow the templates provided by the duplication company
you select. These templates can typically be loaded into
Photoshop as a separate layer, so you can use the template’s guide
lines to know where to put the spine and other elements, and then turn
off the template layer when exporting the final image file for upload
to the
duplication company’s server.
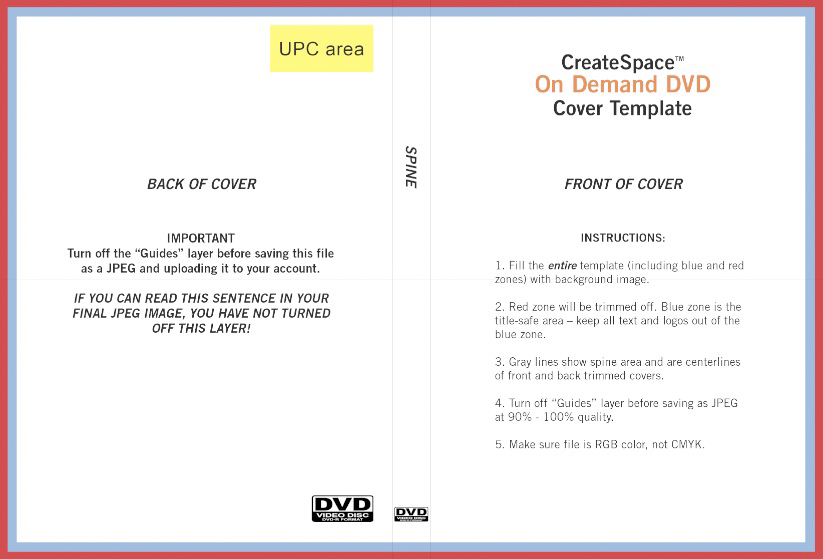
Fig. 15.1.8 : A
template for designing a DVD cover. Note that different
manufacturers use different templates. The colored zones indicate
where
cropping will occur, where bleeding should be extended to, and where the
use of text should be avoided. The template can be loaded into
Photoshop
as a layer that can later be turned off when exporting the final image.
Some companies can also do
full-color printing on the disk itself, which can result in a very
attractive and professional-looking product. You’ll again need to
obtain the company’s template and follow it carefully when designing
your on-disk label. The template will contain guide lines that
indicate where cropping of the image occurs; you just need to make sure
all text is at least some distance from the edge, to avoid cropping of
the text.
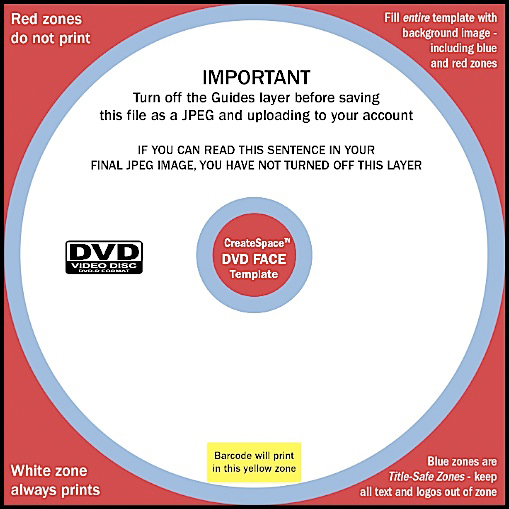
Fig. 15.1.9 : A
template for on-disk printing.
For all of my duplication needs
(including those for my music CD’s) I use a company called CreateSpace.com,
which allows you to sell your products directly on Amazon.com (it’s a
subsidiary of Amazon). The setup process is done on their web
site, and is simple. They provide a “proof” copy that you can
preview to make sure there are no errors. Once you validate the
proof copy, the product goes live on their web site; if you’ve opted
for Amazon distribution, that typically takes a few additional days to
go
live. When someone orders a disk through CreateSpace.com or
indirectly via Amazon, the disk is burned and the package assembled by
the manufacturing company, and is then shipped directly to the
customer; any profits are then deposited in your account. Keep in
mind that manufacturers with high manufacturing prices can limit your
potential sales, by forcing you to charge an unreasonably high price
for your product. CreateSpace’s manufacturing costs are among the
lowest I’ve ever seen. Unfortunately, their printing process
(for the cover) isn’t very good, but it’s reasonable considering the
price.
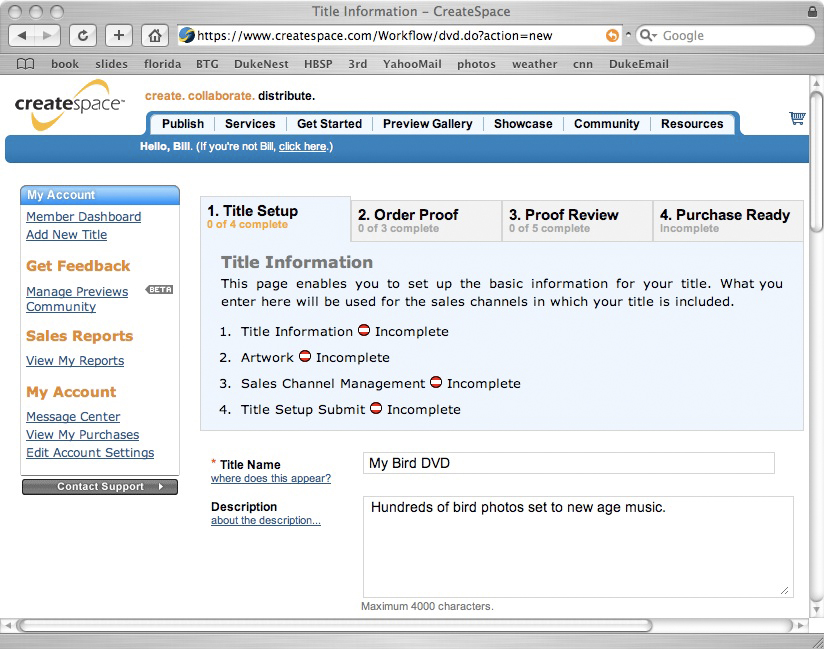
Fig. 15.1.10 :
DVD title setup at CreateSpace. Once you’ve entered all the
required information and sent in the DVD master, the rest is up to the
fulfillment
company. Whenever a customer orders one of your DVD’s, the
manufacturer
handles payment processing, manufacture of the disk and its packaging,
and
then mails the completed product to the customer.
|
|
|