2.3 Megapixels
and
Crop Factors
The single, most highly
emphasized
feature of any model of digital camera is its Megapixel rating. When I got
into digital photography, cameras were around 6 MP (Megapixels),
whereas now they’re typically between 10 and 24 MP. Just as
with the Megahertz wars
between
computer manufacturers in the 1990’s (and the Gigahertz wars that
followed), camera manufacturers are currently in a fierce Megapixel
war, and they’re hoping to capitalize on your ignorance by making you
believe that their newest camera model, by virtue of simply having more
Megapixels than the competition, is therefore superior. As will
be explained here, however, higher Megapixels do not automatically
translate to higher image quality, and in fact many consumer-grade
models with high megapixel ratings produce poorer image quality than pro-grade
or pro-sumer models having fewer megapixels. Understanding the
reasons behind this apparent paradox will be important for anyone
shopping for a camera in the near (and perhaps not-so-near) future.
2.3.1
Pixel Density
The first important concept that
we’ll require for
this discussion is that of pixel
density. This is simply a measure of how tightly packed
the pixels are on the camera’s imaging sensor. We’ll measure this
in pixels per millimeter
(pix/mm). Since the horizontal and vertical pixel densities are
typically the same, we won’t be overly concerned about distinguishing
between these, and will refer to either as simply linear pixel density, or just pixel density for short. The
important thing to understand is that for a
given number of Megapixels (which, by the way, is one million pixels, or one million
of the basic dots that make up an image), the physical size of the
imaging sensor inside the
camera determines how tightly those pixels have to be packed together
in order to all fit on the sensor. As we’ll see, packing them too
tightly can degrade image quality.
In the case of full-frame
sensors, the pixels are spread out over a relatively
large sensor: roughly 36mm by 24mm. This just happens to be the
size of a 35mm film cell (remember film cameras?), and has
come to be known as full-frame
(despite the fact that there are even larger sensors, known as medium format sensors).
As of this writing, most consumer-grade digital cameras are not full-frame: they are cropped, meaning that they are
smaller than a full-frame sensor. For cameras with a 1.5x crop
factor, the sensor is 43% smaller in both width and height than a 35mm
film cell, resulting in a sensor with 66% less area than a full-frame
sensor—a rather substantial loss in
sensor size. This is because the crop factor is applied to both the width and the height
separately.
So, in any
consumer-grade camera with a high Megapixel rating, you can be pretty
sure of one of two things: either the pixels are packed very close
together on the imaging sensor, or the individual photosites (the
electronic elements that capture individual pixels) are each very
small, or
both (i.e., small photosites packed closely together). Figure
2.3.1 (below) crudely illustrates the relationship between pixel count,
crop factor, and pixel density.
Fig. 2.3.1:
Crop Factors and Pixel Density. Left: A full-frame sensor with
40 large photosites (gray circles in the illustration). Right: A
1.3x sensor with
15 large photosites (top) and a 1.3x sensor with 40 small photosites
(bottom).
Having
photosites packed closely together can be
both good and bad. In theory, larger numbers of photosites packed
tightly together should be better at resolving fine details in an
image, such as the individual feather barbs in a bird’s plumage.
To the extent that the real world contains tiny, microscopic features,
an ideal imaging sensor with the tiniest pixels should be best at
capturing and representing those individual features. (A simple
way to think of this is in terms of a fat-fingered pianist: fatter
fingers are more likely to make mistakes by hitting multiple keys on
the keyboard, resulting in a poor performance). Unfortunately,
at the microscopic scale of pixels
and photosites, the inconvenient realities of physics can intrude, as
we describe next.
2.3.2
Noise
The problem with having
photosites that are either small, or closely
spaced, or both, is that the resulting pixel values (i.e., the precise
hue that you see at each pixel in the resulting image) tend to be
affected
by noise. What exactly
do we mean by noise? The simplest definition of
image noise is pixels that are of
the wrong color or brightness. Open any of
your photos in your favorite editing software, and zoom in as far as
you can, till you can see the individual pixels making up the
image. In any smooth, homogeneous background region of the image
you’re very likely to see at least a few pixels that differ
in color or brightness from those around them. These off-color
pixels obviously
don’t correspond to anything in the original scene that you
photographed.
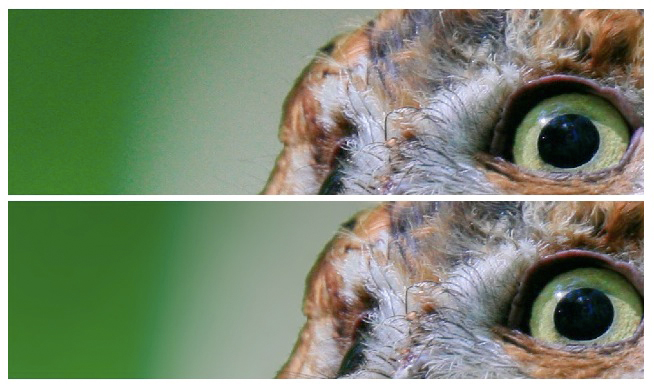
Figure 2.3.2 shows an example of a noisy
image. This Screech Owl (Asio
otus) was photographed with a pro-sumer DSLR camera (the Canon
30D—an 8.3 Megapixel camera with a
1.6x crop factor) at an ISO
setting of 640 (ISO is discussed more fully in section 2.5). At
the top is the raw image, and at the bottom is the same image after
noise was reduced via software. You can see that in the top
image, the background region to the left of the owl is very speckled,
whereas this same region in the bottom photo is much smoother.
Note that noise is difficult to discern in the regions of the image
occupied by the bird. Although in extreme cases it is possible to
see noise in your subject, for moderate noise levels you’ll typically
only notice the noise in smooth, background regions of the image.
Fig.
2.3.2: Digital Noise. Top: A photo taken on a pro-sumer camera
(Canon 30D)
at ISO 640, with noise evident in background regions. Bottom:
same image, after
selective noise-removal in Photoshop. A higher-quality, pro
sensor could
probably produce the bottom image straight out of the camera.
Although the
noise in this photo is likely due primarily to the use of
a high ISO setting (ISO 640 was fairly high when the Canon 30D came
out), noise of this type can also be caused by using a
camera with pixels that are either too small or too closely
spaced. On
the Canon 30D, the linear pixel density is 156 pixels/mm—that
means that if you counted just the last row of pixels along one edge of
the imaging sensor and divided that count by the length of the sensor
(in mm), you’d get approximately 156. In contrast, the Canon 5D,
a
pro-sumer model with a reputation for having much lower noise than its
contemporaries, has a pixel density of only 122 pix/mm. Though
the
bottom image in Figure 2.3.2 resulted from a noise-removal filter
applied in software, you may think of this figure as illustrating,
conceptually, the
difference in noise levels between a camera with small, closely-spaced
photosites (top image) and one with large, well-spaced, or simply
higher-quality photosites (see section 2.3.4,
below).
Precisely what causes noise in small, closely-spaced
photosites is a topic that we will consider later (in section
2.5). For now, we just want to
emphasize the following: that
cameras with higher Megapixel ratings may
(depending on sensor size) have more tightly-packed photosites, and
that for cameras that do have
very tightly-packed photosites, they will tend to have both (1) the
ability, in theory, to resolve finer details, which is a good thing, and also (2) higher
per-pixel noise levels, which is a bad
thing. Precisely how much
of a good thing and how much of a bad thing, and what is the sum effect
of these, is a question that is camera-specific. The only way to
find out for sure which of two cameras with different pixel densities
actual provides more useful imaging detail is to compare the two
side-by-side in controlled tests, and unfortunately, this is difficult
for consumers to do and is rarely done by professional product
reviewers (see the Comparometer
at imaging-resource.com
for some examples).
Just to make sure we’re absolutely clear: How
can noise reduce the effective resolving power of a high-resolution
sensor? If it’s high-resolution, it’s high-resolution,
right? The subtlety here is that noise tends to be more visible
the further you zoom in on the image, when you’re viewing it on your
computer. As you zoom in, noise that you didn’t notice before
zooming suddenly starts to become more apparent. When the bird
only fills a small part of your image frame, you’ll typically want to
zoom in a bit to make the bird appear larger in the frame. The
problem with noise is that it limits how much zooming you’ll be
comfortable with. With high noise levels, you may not be able to
zoom in enough to make the bird appear as large in the frame as you’d
like, since at a high zoom factor the noise may become so bad that the
image just looks terrible—like a channel on a television
with poor reception.
But, can’t we just remove the noise later in
software?
Sometimes, yes. If the noise is fairly
moderate, it should only affect the background regions (or
smoothly-colored regions of your subject, if any), and in this case you
can, with sometimes greater or lesser effort, remove the noise pretty
effectively in software. The problem is that noise reduction
software generally also reduces the sharpness of your
image. One solution is to painstakingly mask out the bird
and then to apply noise reduction only to the background regions of the
image. If you have plenty of spare time to manually process your
images in this way, then noise induced by small photosites may not
overly concern you. The greater concern is whether you’re gaining
anything by buying a camera with both more pixels and more noise, and
unfortunately, that’s a question that typically can’t be answered
without actually buying two competing models and testing them out
yourself to see which produces more “zoomable” images.
Though it’s quite a hassle to do, it is possible to
perform such comparisons. Sites like Amazon.com that have a 30-day
return policy, or like Adorama
and B&H that have a
14-day return policy, will often accept returned products for a full
refund, so you can, if you feel so inclined, buy two cameras, perform
detailed comparisons within the allotted return period (being careful
to read the fine print on the merchant’s return policy, such as regards
activation counts),
and then keep the better of the two models and return the other.
Until professional product-review sites start performing these types of
“empirical resolution” comparisons for us, we consumers
have few other
options.
The option that I like best is to simply buy the
most expensive camera offered by a manufacturer, subject to my
budgetary constraints. Within a given product line from a single
company, it’s generally the case that you
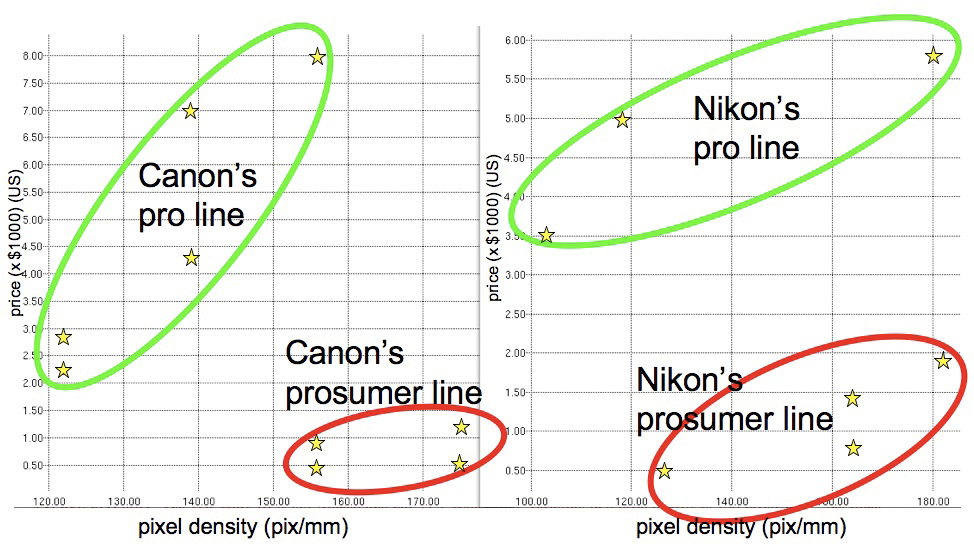
get what you pay for. If you look at the graph below,
you’ll see that while Canon’s and Nikon’s professional camera lines
cost a lot more than their pro-sumer lines, they tend to have pixel
densities less than or equal to that of the cheaper pro-sumer
models. This is significant, for the following reason:
professionals do indeed buy the pro models, despite their often having
lower pixel densities than cheaper models. And why would they do
that? I’ll tell you why: because the pros know that the pro
models really do produce better images, even if they have fewer pixels
or lower pixel densities.
Fig.
2.3.3: Pixel Density Versus Price. Left: Canon. Right:
Nikon.
The x-axis gives pixel densities in pixels/mm. The y-axis gives
price
in US dollars. Pro cameras tend to have higher prices despite
having
lower pixel densities. (Data current as of 2007).
Fig. 2.3.4:
Prices and pixel densities of Canon cameras (2007).
Fig. 2.3.5:
Prices and pixel densities of Nikon cameras (2007).
The moral of the story is: don’t
be fooled by either Megapixels or pixel densities. My advice is
to select a manufacturer with the best product line of birding lenses
(see Chapter 3), and then to buy the most expensive camera from that
manufacturer that you can afford. That’s what I’ve done, and I’ve
yet to regret it.
2.3.3
Crop Factors and Magnification
Although the internet can be a
great place to get certain types of information, in the case of
digital camera technology, the amount of misinformation circulating
around is just astounding. There are two important myths that we
need to consider here. The first is the so-called full-frame advantage. This
one isn’t quite as ridiculous as the other, since for some situations,
and within the context of particular product lines, there certainly is
or has been a “full-frame advantage”. For bird photography,
however, the ability to capture wider angles (still the primary
advantage of full-frame cameras) is seldom useful. Since most
birds are both small and wary (meaning that they keep their distance),
it is much more common for the bird to appear too small in frame than
to appear too large. In this regard, there’s scant reason to
prefer the larger-framed sensor to the smaller one, as a general rule.
The full-frame advantage, however, typically refers
to another advantage that full-frame sensors have traditionally (i.e.,
in the recent past, and perhaps temporarily for the present) had: that
particular full-frame camera models have tended to have low pixel
densities and therefore superior noise characteristics. To my
knowledge, there is no inherent reason for this. If a
manufacturer can produce a full-frame sensor with a low pixel density,
then they should be capable of producing a crop sensor (i.e., 1.3x,
1.5x, 1.6x, 2x) having the same, low pixel density, and therefore the
same noise characteristics. For the consumer, what is most
relevant here is what camera models are actually available, and with
what pixel densities and photosite technologies. The point,
though, is that when comparing two camera models, the fact that one
model is full frame while the other is not, is irrelevant (all other
things being equal) once you know which camera has the lower pixel
density, or better yet, which has the better image quality. As I
mentioned before, the more expensive of the two is likely the better
model (as long as you’re comparing cameras from the same manufacturer).
The other major fallacy, or myth, that needs to be
addressed is that of crop sensors providing greater magnification, or “reach”. More specifically, many
people incorrectly regard a
camera with a 1.5x crop factor (for example) as providing a “free” 50%
increase in magnification. This would be true only if you were
comparing such a crop camera to a full-frame camera with exactly the
same Megapixel rating, since only then would the (linear) pixel density
be 50% greater. But even then, in order to actually achieve a 50%
increase in the apparent magnification in your final images, the crop
sensor would have to provide equal image quality, in terms of per-pixel
noise, to that of the full-frame camera. In practice, 1.5x crop
sensors typically don’t have the same number of Megapixels as
same-generation full-frame cameras, and for those that do, the
increased noise level would very probably force you to be more
conservative in cropping the final image around the bird during
postprocessing.
As a result, in the final image, assuming your
standards for image quality are applied equally to the crop camera and
the full-frame camera, the apparent magnification in the final images,
after postprocessing, probably wouldn’t be a full 50% over the
full-frame, and depending on the image quality of your crop camera, you
might not be getting any
additional magnification at all (in the final, postprocessed
image). Another way to put it is that if you did postprocess the
images from the two cameras so that the image from the crop camera
showed a 50% increase in bird size, that image would probably be
noisier than the image from the full-frame sensor—and it may be so much noisier that you wouldn’t
feel comfortable publishing that image at that size. Most
importantly, just remember: there is no free lunch. If two
cameras from the same manufacturer differ by $1000 or more in price,
the more expensive camera is very, very probably the better of the two,
for most photographic purposes. Again, I refer you to the figure
above showing that the more expensive pro models have tended to have lower pixel densities than the
pro-sumer models.
Finally, since we’ve been talking about pixel
densities, let’s briefly consider how to compute them.
Manufacturers and retailers virtually never provide pixel densities in
their advertised camera specs, but they’re easy to compute, as long as
you know the crop factor and the Megapixel rating. If your sensor
has a 3:2 aspect ratio (which the vast majority of DSLR’s do nowadays,
including all those from Canon and Nikon), then the formula for pixel
density is:
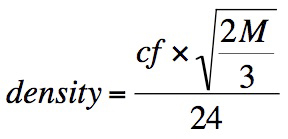
where M is the number of
pixels (i.e., roughly 8,200,000 for the Canon 30D, an 8.2 Megapixel
camera) and cf is the crop
factor (e.g., 1.6 for Canon’s consumer and pro-sumer models, 1.5 for
many of Nikon’s models, and 1.3 for Canon’s most popular pro
bodies). If your camera’s sensor has an aspect ratio of other
than 3:2, then you’ll need to replace the 2/3 in the numerator of the
above equation with the appropriate ratio.
That’s all you
really need to know about computing pixel densities. Now, let’s
have a reality check. I’ve spent most of this section telling you
that higher pixel densities tend to result in more noise and therefore
crummier images. Given the never-ending
hype about higher-and-higher Megapixel cameras, are you really going
to choose your next camera model by selecting the one with the lower
pixel density, when everyone else is choosing higher Megapixels? Obviously,
as the technology advances, the
manufacturers’ ability to produce high-density sensors with lower noise
levels will (hopefully) improve. But within a single generation
of
cameras, I do believe the trend for lower-density sensors to have
better noise characteristics is a strong one. As a case in point,
though DSLRs are now available from the top manufacturers with 15 MP
and even 21 MP, I prefer my 10 MP pro Canon body (the 1D Mark III), and
feel that it provides all the detail I need. The noise
characteristics
of this body are excellent. Future bodies should, however, be
even
better.
As a further case in point, the hummingbird shown
below was photographed through a dirty pane of glass while hand-holding
a 400mm f/4 lens. The
camera was the 8.2 Megapixel Canon 30D. I’ve heavily cropped
around the bird, so what you see below is just a small portion of the
full image (the full-sized image is shown below the main figure, for
reference). Yet, with only 8.2 MP I was able to capture minute
details on this extremely tiny bird, without flash, and without a
tripod (though with Image
Stabilization enabled):
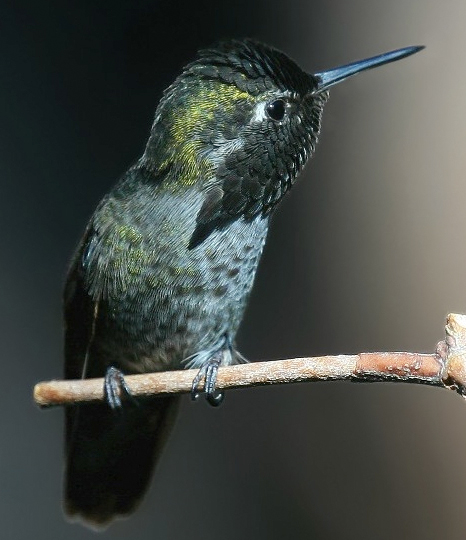
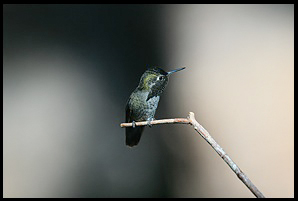
Fig. 2.3.6:
Anna’s Hummingbird (Calypte anna). Taken with the Canon 30D,
an 8 MP camera, and heavily cropped in postprocessing. Top:
Cropped image.
Bottom: Original. 1/800 sec, 400mm, f/4, ISO 500. No flash.
The above discussion about noise levels and image
quality resulting from particular photosite sizes and spacing is based
on the assumption that “all other things are equal”. In other
words, we’re talking about current state-of-the-art manufacturing
technology. There are some particular tricks that manufacturers
can employ (or will soon be able to employ) to reduce noise levels at a
particular photosite density and/or spacing. We briefly consider
a few of these next.
2.3.4
Sensor Technologies
One of the most exciting advances
in sensor design that I’ve recently found out about is the use of
so-called microlenses.
These are tiny lenses each of which is positioned over a single
photosite on a sensor. So, for a 10 MP sensor, imagine ten
million tiny lenses arranged in a precise rectangular array roughly
35mm long. Wow.
The effect of microlenses is to improve the signal-to-noise ratio at each pixel
in an image. As figure 2.3.7 illustrates, the use of microlenses
results in more of the incoming light actually being collected and
measured by the photosite. The image shows a single pixel,
edge-on (i.e., viewing a slice of an imaging sensor, from the
side). Because there’s empty space between photosites on the
sensor, much of the incoming light is lost, since it strikes the
non-reactive space between photosites. The use of a microlens
positioned above each photosite increases the proportion of incoming
light that is actually captured and effectively utilized by the
photosite, resulting in more signal relative to a fixed amount of
noise. The result is less per-pixel noise in the resulting image.
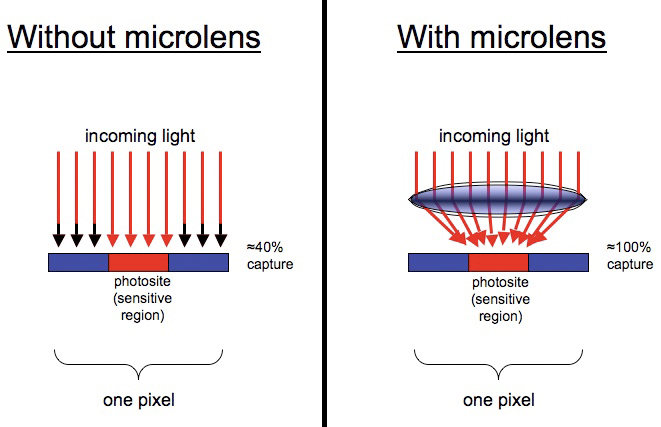
Fig.
2.3.7: Microlenses. Left: no microlens. Incoming light that
misses the
photosite is lost. Right: photosite with microlens. More of
the light is harvested
by the photosite, as a result of the light-bending properties of the
microlens.
(Percent captures in this example are completely hypothetical).
A much more
recent advance is the so-called back-illuminated
CMOS, in which light sensitivity is increased by moving the
photosensitive material to the top of the sensor and moving the
attendant wiring below. Apparently, with traditional CMOS
sensors, some of the wiring for the photosites ran above the
photosensitive material, and some percentage of the incoming light
would strike the wiring instead of the photosensitive well, resulting
in some loss of signal. Now that manufacturers have figured out
how to manufacture the photosites with the wiring on the other side of
the photoreceptive material, more of the light is actually registered
and turned into signal. Additionally, moving the wiring below the
photosite apparently reduces noise due to heat, since less of the heat
(and perhaps magnetism?) generated by the near circuitry is radiated up
into the path of the incoming light.
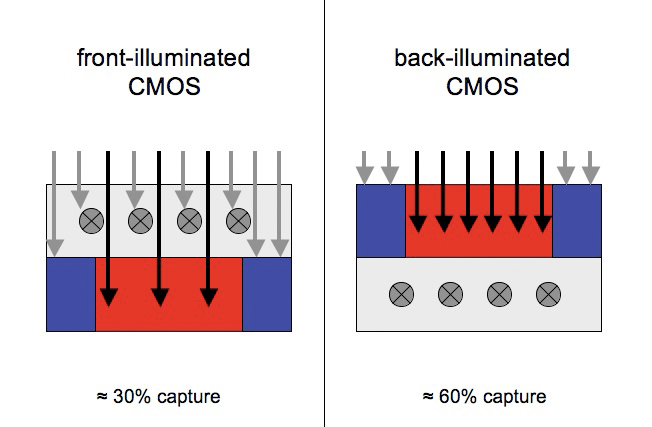
Fig. 2.3.8:
Front vs. Back Illuminated CMOS Sensors. Left: in a
front-illuminated
photosite, some of the light strikes wiring on the chip (gray X’s) and
is
lost.
Right: by moving the circuitry below the photosensitive material, less
light is lost
(Percent captures in this example are completely hypothetical).
As time advances, other improvements in sensor
technology may be expected to occur. For the purposes of bird
photography, our main interests will be in seeing sensors emerge with
both higher pixel densities and
lower noise. To the extent that this is possible, we’ll be able
to “put more pixels on the bird” as it is sometimes said,
resulting in
more resolvable details of a given bird at a given distance. Just
how much more progress can be made in this direction is unclear.
My guess is that there are probably limits to what can be achieved at
the microscopic level of photosites, imposed either by manufacturing
technologies or even by the laws of physics (such as when the size of a
photosite drops below the longest wavelength of visible light).
Individual photosites only collect so many photons per unit time.
Smaller photosites will necessarily collect fewer photons in a given
time interval, and will therefore suffer from increased sampling error and resultant
noise. Note also that as sensor resolution increases, small-scale
defects in lenses may become a limiting factor. How
soon such considerations may begin to limit technological progress, and
whether there are any “tricks” that manufacturers can use to
effectively overcome these limits, is anyone’s guess.
In summary, for the purposes of bird photography
with currently-available DSLR’s, the treatment above should provide
sufficient explanation of imaging technology, as it currently stands,
to serve as a basis either for choosing a camera or conceptualizing how
your camera’s imaging sensor works, at a very basic level. As
advances occur that provide significant improvements in our ability to
capture detailed images of birds, I plan to document them here, so
check back periodically.
|