|
11.4. Eye Shine
and Catchlights
An unfortunate side-effect of
using flash is the so-called steel-eye
effect (more generally known among naturalists and wildlife
photographers as eye shine)
that sometimes occurs. As explained in section 4.3.3, the
incidence of steel eye can be reduced by raising the level of the flash
above your camera’s lens (though this can be a distance-dependent
remedy, as explained below). Raising the flash creates other
problems, however: the flash may be more unwieldy to carry in the field
(not to mention more fragile, due to the additional mounting hardware
and cables required), and aiming the flash precisely at the subject
becomes more difficult since the light path of the flash becomes more
oblique to the imaging light path of your lens. Fortunately, most
cases of steel-eye can be fixed fairly easily in Photoshop, rendering
the use of off-shoe flash brackets less critical.
Consider the example image below. On the left
is the raw image. The large gray disk in the bird’s eye
corresponds to the bird’s pupil; the gray appears because the light
from the flash is passing through the bird's pupil and striking the
highly reflective layer of cells in the bird’s retina (at the back of
the eyeball), called the tapetum lucidum.
By moving your flash unit further from your lens (in any direction—but
usually upward), at close distances the angle of the flash's light rays
will keep those rays from reflecting back in the direction of the
camera once they’ve entered the bird’s pupil. At longer distances
you may need to move the flash unit progressively further from the lens
(e.g., elevate the flash bracket even more) to achieve the same angle
as measured at the bird’s eye, since that angle is distance-dependent1.
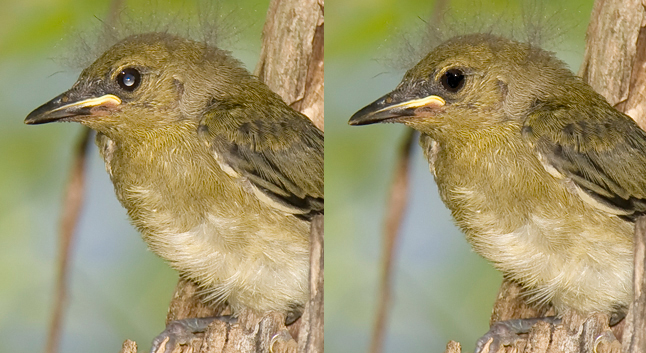
Fig. 11.4.1:
Fledgling prothonotary warbler. Left:
prior to postprocessing, the eye shows steel-eye (on
the retina), flash point reflection (on the cornea), and a
natural catchlight from the sun. Right: after painting
the eye black using the brush tool and then adding an
artificial catchlight with the pencil tool.
Note in the
above image (on the left) that in addition to the gray disk there are
two tiny points of light, one at the center of the bird’s eye (within
the disk) and one at the 11 o’clock position at the perimeter of the
eye. These points of light are reflections from the bird’s cornea,
which is on the front (outside) of the eyeball; thus, these originate
from a different anatomical part of the bird’s eye. The bright
dot in the center of the eye is a point
reflection of the flash. However, the white dot in the
upper left is actually a catchlight (also known as
a specular highlight)—a point
reflection from the sun. Catchlights (from the sun) are natural,
and in fact are desirable with black-eyed birds, because without a
catchlight the eyes look dead. In the right pane of the above
figure we’ve eliminated both the steel-eye and the two points of light,
by painting over them with a black brush, and then added a smaller,
rudimentary catchlight in the 1 o’clock position using a white pencil
tool. In this case we could have left the original catchlight
that was present in the 11 o’clock position, but its proximity to the
outer edge of the eyeball was slightly distracting, so a new one was
drawn elsewhere. In the rest of this section we’ll explore
methods for creating and positioning catchlights in birds’ eyes.
Note that birds with non-black eyes typically don’t need a catchlight,
because the contrast between the pupil and the iris usually gives the
eye sufficient detail to avoid looking dead or artificial.
Removing a catchlight from a non-black eye can be done either using a
brush of the appropriate color, or using the clone tool (section 11.5).
The figure below shows a random sample of natural
catchlights taken from bird photographs in which flash was not used
(i.e., these are natural reflections of sunlight, and would be visible
to you even if you were just looking at the bird through binoculars or
with the naked eye). There are several generalizations we can
draw from these examples. First, they mostly range from the 10
o’clock to the 2 o’clock positions (with a few exceptions). This
is because the sun is usually above the bird, so its reflection will
generally be in the upper half of the bird’s eye.
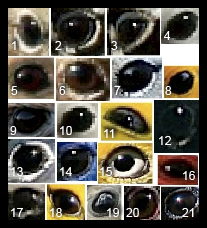
Fig. 11.4.2:
Natural catchlights created by the sun (not flash!)
in a variety of birds’ eyes.
Second, the catchlight tends to be
a concentrated point of white, though it can also appear as a more
diffuse gray area (e.g., eyes #7, #8, #9, #19 in the above
figure). These latter diffuse patterns tend to occur when the sky
is very bright but the sun itself is not directly visible in the sky
(as on days with a thin white layer of clouds in front of the
sun). In extreme cases, you can see (if you zoom in on a RAW
file) a detailed reflection of the horizon (e.g., eye #9 above).
When the bird’s eye already shows a natural
catchlight, in most cases you’ll probably want to simply leave it
as-is. If there’s any steel-eye or flash reflection on the
cornea, and if you can remove those artifacts without also removing the
catchlight (i.e., by painting over them with a black brush, while being
careful not to paint over the catchlight or even to disturb the subtle
corona or gradient that may be present around the catchlight), then
that’s usually desirable. In cases in which there is no
catchlight, or in which you have to eliminate the catchlight in order
to also eliminate any steel-eye, you’ll want to draw in an artificial
catchlight afterward. In order to learn how to do that, it’s
useful to take a detailed look at some natural catchlights at the pixel
level. For this purpose, in the figure below we’ve enlarged the
eyes from the previous figure, to reveal the individual pixels making
up the image.
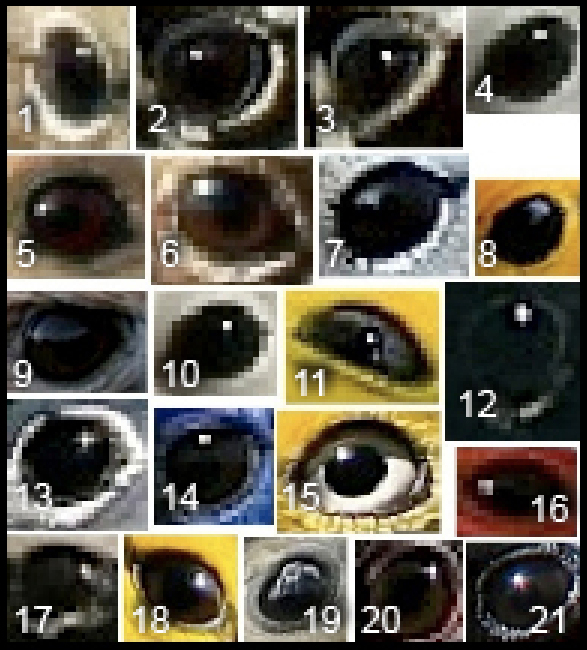
Fig. 11.4.3:
Enlarged view of previous figure. Notice
that many catchlights consist of a small number (1 or 2)
of white pixels surrounded by a horizontal and/or vertical
pattern of darker gray pixels. Such a pattern is not difficult
to draw with Photoshop’s pencil tool when you need to add
an artificial catchlight.
Notice that in many cases the catchlight consists of
one or two bright pixels flanked by some number of darker pixels.
Often those flanking, darker pixels spread outward from the bright
center in a strictly horizontal or vertical direction. Imitating
this type of catchlight is quite easy in Photoshop, using the Pencil tool:
In the image below we show such an
artificial catchlight. On the left is the zoomed-in view, which
shows that we’ve drawn a single white pixel and then two darker pixels
next to it. The right pane shows the effect when viewed at 100%.
Fig. 11.4.4: A
rudimentary, artificial catchlight. Left: zoomed-in view
of the bird’s eye, with a three-pixel catchlight drawn in with the
pencil
tool in Photoshop. Right: the zoomed-out view of the bird.
Note that you’ll usually have to experiment with
different brightnesses when drawing the catchlight with the pencil
tool. You can do this one of two ways. First, you can
change the pencil color from pure white to a shade of gray and then
re-draw it in the same position. This can become tedious after
doing it many times. Another option is to simply draw it once
using the brightest shades (i.e., pure white for the main point and
half-gray for the two flanking points), and then select the eye using
the Quick Select tool and use
the Levels tool to darken the
catchlight until it looks good to you.
Larger catchlights can in theory be drawn using the Brush tool (with a soft-edged
brush) rather than the Pencil tool,
though it can be difficult to make this work convincingly in
practice. If you’re especially good at digital painting and/or
you have the patience and creative bent, you might try creating one of
the more diffuse types of catchlights as exemplified above (e.g., #7,
#8, #9 in Figure 11.4.3). Doing so requires that you keep in mind
the implied curvature of the eye when you paint in the diffuse
shape. Note that you’ll probably want to do your painting when
zoomed in quite far, so you can see the individual pixels (to make sure
you’re not painting over those pixels that border the eye); however,
you’ll almost certainly want to assess the aesthetic effect on the
zoomed-out (100%) view.
Another option worth considering is to clone a
catchlight from another of your photos, using the Clone tool (section 11.5), or by
copying the catchlight from one image and pasting it as a new layer in
the other image. In a similar way, if you don’t like the position
of a natural catchlight, you can copy it to a separate layer (of the
same image), paint over the original catchlight with a black brush, and
then use the Move tool to
drag the catchlight around to different positions in the eye, until you
find a position that looks best to you. A particularly convenient
way of doing this is to use the arrow keys on your keyboard to move the
catchlight layer by tiny increments in any direction, so you can assess
the visual impact of these small changes without the mouse cursor being
in the way. Note that you’ll also want to turn off the “Show transform controls” checkbox in the Move tool’s parameter panel, to
avoid distraction.
Finding the ideal position for a catchlight is not
always easy. Ideally, you need to know the location of the sun,
relative to the scene. This can often be deduced by observing the
directions of shadows in the photo. Once you know the location of
the sun relative to the locations of the bird and the camera, you can
deduce (roughly) the angle at which rays of sunlight strike the bird’s
eye. Recall from elementary physics that the law of specular
reflection states that in the case of a planar mirror, the angle of incidence equals the angle of reflection. For a
spherical object such as a bird’s eyeball, this law can be applied by
considering a plane tangent to the sphere, as illustrated in Part A of
the figure below.
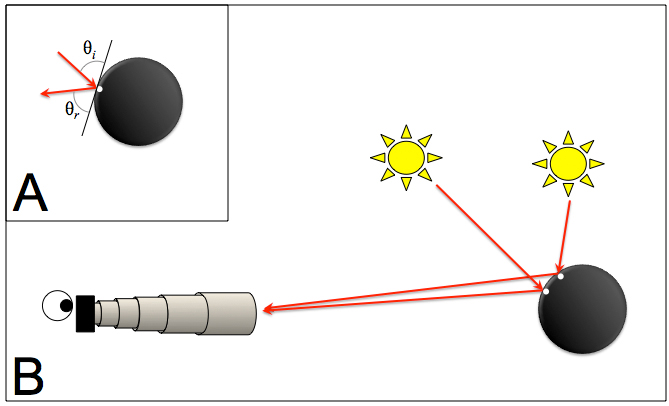
Fig. 11.4.5:
Angles and reflections. (a) The law of specular reflection
for spherical objects says that the angle of incidence (θi) is equal to
to the angle of reflection (θr) as measured
with respect to the tangent
plane at the reflection point. (b) Different positions of the
sun, relative to the
bird, give rise to different locations for the catchlight on the bird’s
eye, as
seen by a distant observer (the black sphere represents the bird’s
eyeball).
In Part B of the figure above we consider the point of reflection on
the surface of a sphere for the sun at different angles relative to the
sphere and the camera. The white dot represents the specular
highlight that would be perceived on the surface of the sphere from the
perspective of the camera at left. Thus, with the sun directly
over the bird, the catchlight would appear quite high in the visible
portion of the bird’s eye, whereas with the sun at a lower elevation
(or behind the camera), the catchlight would appear lower in the eye.
Obviously, you don’t kneed to compute angles and
perform precise ray tracing in order to find the ideal location for an
artificial catchlight in a bird photo. In practice, you can
follow your intuition by trying various locations for the catchlight
and taking note when your visual instincts respond favorably to what
they’re seeing. The primitive parts of your animal brain are
surprisingly good at alerting the rest of your psyche to things that
look unnatural (or, conversely, things that look especially
attractive). Much of the art of digital postprocessing—perhaps
far more than you realize—is about learning to listen to that part of
your brain and trust in your instincts.
1Think
about what happens to an isoceles triangle when you stretch the
triangle to make it taller: the angle of the apex decreases. In
the
limit, this angle will approach zero, and the two sides of the triangle
will therefore tend increasingly toward becoming parallel.
|
|
|


