|
6.8 Rapid Exposure Adjustments
During intense shooting
situations, it can be important to be able to very rapidly adjust
exposure. This is true whether you’re using manual exposure or
one of the automatic exposure modes. A very common scenario is
one in which the bird or birds you’re working keep moving in and out of
the shade. In a complex environment, the shady areas may be
extensively interspersed with the sunny areas, so that movement of the
bird between shade and sun may happen every few seconds. Although
spot metering may work well for you in some of these situations, in
others you may find that the metering sensor is larger or smaller than
the bird, so that the meter reading is affected by other parts of the
scene besides the bird. I’ve had little luck with spot metering,
especially for small birds such as warblers, and have therefore tended
to opt for either evaluative/matrix metering coupled with
aperture-priority (Av) exposure mode, or more recently by simply using
fully manual mode most of the time (and disregarding the meter reading).
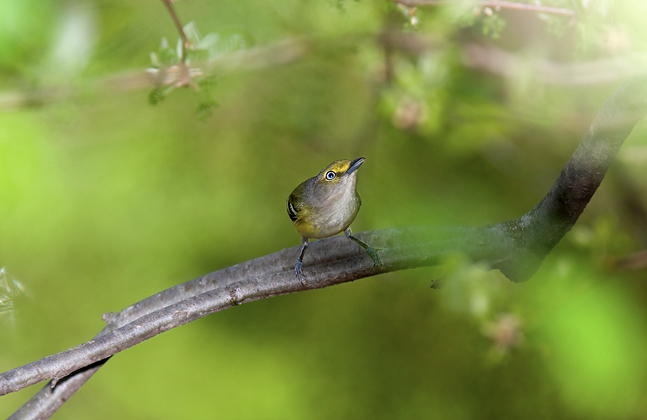
Fig. 6.8.1 :
White-eyed vireo in a field of green. Because I was using Av,
rapid
changes to exposure were very easy, via the EC dial on my camera.
(1/200 sec, f/11, ISO 320, 840mm, Av with -1 EC,
TTL flash at -2/3 FEC)
When using evaluative metering and automatic
exposure (Av or Tv), changes to the exposure level can be made very
rapidly via exposure compensation (EC) settings, as long as the EC is
mapped to a conveniently accessible dial or other control on your
camera (such as a joystick or pair of buttons). After taking a
shot and then quickly glancing at the image as it briefly displays on
the camera’s LCD, you may decide to dial in a +1 or -1 adjustment on
the EC control before taking the next shot. Typically you’ll only
need to make a few such adjustments before getting the exposure you
want—as long as the bird doesn’t move from the sun to the shade (or
vice versa). Once you’ve found a suitable EC setting—say, -2
for example—that works well while the bird is in the sun, you can
then concentrate on finding a setting that works well when that bird
moves into the shade. Suppose that +3 works well in the shade for
this particular bird. Making a mental note of these two
settings—+3 for the shade and -2 for the sun—will allow you to more
efficiently work this particular bird for the duration of the
shoot. Every time the bird moves from the sun to the shade, you
can simply turn the EC dial 5 clicks—from -2 to +3—without taking
your eye from the viewfinder. When it moves back into the sun,
you turn the dial 5 clicks in the other direction. As long as you
don’t accidentally turn the dial the wrong number of clicks, or in the
wrong direction, this strategy can be very quick and very
effective.
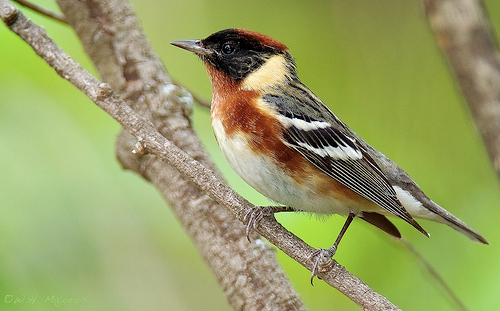
Fig. 6.8.2 :
Bay-breasted warbler on the shore of Lake Erie. Warbler
photography provides its own special challenges, because the birds move
quickly and rarely stay in one place for long. The ability to
make rapid
changes to exposure parameters can be especially useful when shooting
warblers.
The same strategy works in manual mode, except that
you need to select one or more parameters—aperture, shutter speed, or
ISO—to swap between the sunny and shady scenes (or when rapidly
switching between a light-colored bird and a dark one). The
selection of
parameter(s) to adjust is often dictated for you by the shooting
scenario. If, for example, your shutter speed is already at the
lower limit for eliminating motion blur, and your aperture is already
wide open (or as wide as your lens can open without compromising
sharpness), then you’ll probably want to stick to adjusting
ISO—taking care, of course, not to increase the ISO to such a high
value that your image is excessively noisy.
Regardless which exposure mode you use, it’s best if
your camera allows you to re-map the exposure controls (such as EC,
ISO, etc.) to the most accessible dial on your camera, as noted earlier
in this chapter. My current camera has two dials, one on top next
to the shutter release, and one on the back next to the LCD.
Since adjusting the top dial requires taking my index finger off of the
shutter release, I prefer to make most of my adjustments with the back
dial, since my thumb is always free to adjust that. Thus,
whichever parameter (ISO, aperture, shutter speed) I’m modifying the
most in a particular shooting scenario is the parameter that I map to
the back dial. That way I can adjust the exposure without having
to lift my finger off the shutter release, which is useful when using
the focus-and-recompose method (or when tracking a bird in continuous
AF mode). People who are especially
coordinated may be able to operate the shutter release with the middle
finger, the top dial with the index finger, and the back dial with the
thumb, all at the same time.
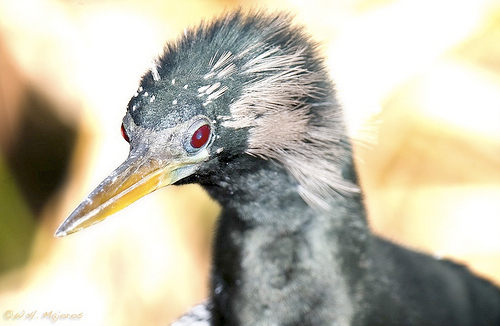 Fig.
6.8.3 : Anhinga with bright background. For this photo I relied
very
Fig.
6.8.3 : Anhinga with bright background. For this photo I relied
very
heavily on the BETTR (Bird Exposed To The Right) technique, to avoid
underexposure of this dark bird in such a bright scene. Note that
the
bright background didn’t extend far to left or right: a small shift in
camera position could result in a very different exposure in Av.
But in
manual mode with flash providing the subject’s primary lighting, few
changes were required as I worked this subject. (1/125 sec, f/9,
ISO 125,
600mm, manual mode, TTL flash)
|
|
|
