|
6.5 Autofocus Modes
There are two main autofocus (AF)
modes
offered by virtually all DSLRs: one-shot,
and servo (or continuous
AF). In servo mode, depressing the shutter-release button
halfway engages the camera’s autofocus system, which actively continues
to adjust the focus for as long as you keep the shutter-release half
pressed. For birds in motion, this is precisely what you want: as
the bird changes its distance to the camera, the camera tracks the bird
by continuously adjusting the focusing element in the lens.
Ideally, the camera will keep the bird perfectly focused for as long as
you continue to hold the shutter-release half-pressed; when the bird
assumes the pose or position that you want, you can simply press the
button the rest of the way to take the photo. Of course, in
practice the AF function of the camera may not always be able to
perfectly track the bird, depending on the speed and regularity of the
bird’s motion, the capabilities of the camera model you’re using, and
your own ability to keep the AF sensor(s) positioned on the bird in the
viewfinder (see section 2.6 for a thorough
discussion of how autofocus
works in DSLRs).
For birds that are not in motion, you may instead
prefer to use one-shot
AF. In one-shot mode, as you depress the
shutter-release button halfway, the camera’s AF engages just as in
servo mode, but once the camera achieves a “perfect” focus it stops
tracking the bird and leaves the lens’ focusing element
stationary. If the bird is truly stationary, then after the
camera acquires its initial lock on the focus, no further re-adjustment
should be necessary, and one-shot mode should be sufficient. In
some situations, however, servo can be useful for stationary
subjects. For a bird that is currently stationary but that might
take to flight at any moment, it’s best to keep the camera in servo
mode if you want to get photos of the bird in flight.
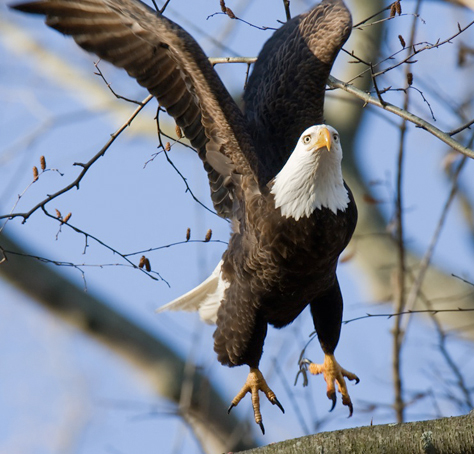
Fig. 6.5.1 :
From stationary subject to flight shot. By keeping your
camera in servo when shooting a stationary subject that might fly,
you can be ready to get the “jump shot” when the bird
finally does
take to flight. (1/200 sec, f/11, ISO 640, 840mm, Av with -1/3
EC,
TTL flash)
While the bird remains stationary, servo will
continue to re-assess the
focus of the bird, and may make small adjustments to the lens’ focusing
element, especially if the bird is moving its head or other extremities
while remaining perched in one location. While the bird remains
perched you can take shots as desired, while still being ready to track
the bird in flight when it eventually leaves its perch.
Unfortunately, some cameras’ AF modules get “jittery” when using servo
mode to continuously focus on a stationary subject, so that the bird
may go in and out of focus slightly even though it’s stationary.
If your camera is one of these, then you may want to avoid using servo
for stationary birds. You might also consider contacting your
camera’s manufacturer to find out if an adjustment to the AF system can
be carried out to make it less “jittery”; some users have reported less
jitteriness after having the camera serviced by the manufacturer.
There are a few things to consider when developing
your focus technique in the field. First, if you’re having
trouble acquiring initial focus for birds that are moving quite a bit
(such as songbirds foraging in a tree), try turning off image stabilization (IS—section 3.5),
since IS can slow
down the initial focus acquisition. When shooting foraging
warblers, I’ve found that turning off IS can give me a half-second
advantage in terms of getting the bird in focus and rapidly snapping a
few shots before losing the bird—for some birds, that half second
can make the difference between getting the shot and not getting the
shot. Also, when shooting foraging birds, I like to re-aquire
focus (in one-shot AF mode) for each shot, just in case the camera gets
the focus wrong for one or more of the shots. This also helps
when you’re shooting with a very shallow depth-of-field (DOF) and can’t
precisly position the AF sensor on the bird’s eye; by taking lots of
photos with each one having been re-focused, you increase the chance of
getting a shot with the bird’s eye in perfect focus. Re-aquiring
focus for each shot in one-shot AF mode is easy: simply lift your
finger off of the shutter-release button after each shot and press it
all the way down for each shot, to both engage the AF and release the
shutter in a single stroke. If your camera’s servo is reliable,
you can instead use servo mode to achieve the same effect, though you
run the risk of losing focus due to branches and leaves that get in the
way. One-shot AF gives you more control in these situations.
It’s also a good idea to check your camera’s back
LCD to ensure that you’re getting sharp images. During any pause
in shooting, it’s a good idea to review a few recent shots by zooming
all the way in on the images and checking for critical sharpness.
If shots that you thought were well focused when you were snapping them
look fuzzy on the LCD, this could indicate some hardware malfunction,
such as a front- or back-focusing issue in the camera. If your
camera has an AF microadjustment
feature (section 2.7.3), you might try
tweaking that in the field to
correct such problems. (I sometimes tweak my AF microadjustment
for different shooting situations and for birds of different sizes—e.g., if I’m focusing on the
bird’s shoulder but want the eye to be in focus, the AF microadjustment
can sometimes help by pushing the true focus point back a few inches
from the shoulder to the eye). Note that dirt particles can
potentially cause AF problems, so if your camera’s AF starts to behave
strangely, you might want to check for excessive dirt on your mirror or
on the slide-in clear filter in your telephoto lens (if it has one).
|
|
|