|
14.3 Putting
Your Photos on Display
For many people, getting their
very own artwork into a gallery where the general public can view it is
a wonderfully satisfying achievement. Once you’ve got to the
point where you think your portfolio contains a number of images that
are either exceptional in some way or would likely be of interest to
general audiences, you might want to consider putting those photos on
display in an art gallery or other exhibit. Doing so can involve a
very considerable amount of work, but for many people the chance to
reach a wider audience is worth the effort.
The first possibility you might consider is
participating in an art show hosted by your employer or your school (if
you’re a student). Many
employers support such events, viewing them as low-cost methods for improving
workforce morale. If your employer doesn’t have a yearly employee
art show, consider approaching management about the possibility of
starting one; all that’s really needed is some
after-hours office space and some volunteers to help organize the event
(some wine and cheese can be good to have on hand as well, and needn’t cost much). My first “public” photo exhibit was at an employee
art show hosted at a hospital, which afforded me the satisfaction of
knowing that not only were a large number of people being exposed to my
artwork, but also that by participating in the event I had the
opportunity to possibly ease the suffering—no matter to what small
degree—of the ill and the infirm. Donating your artwork for
auction by a non-profit organization is another way to contribute to
the needy—whether needy humans or needy birds. As just one
example of the latter, some raptor rehabilitation facilities (such as
the Carolina Raptor
Center) depend on contributions such as these for much of their
funding.
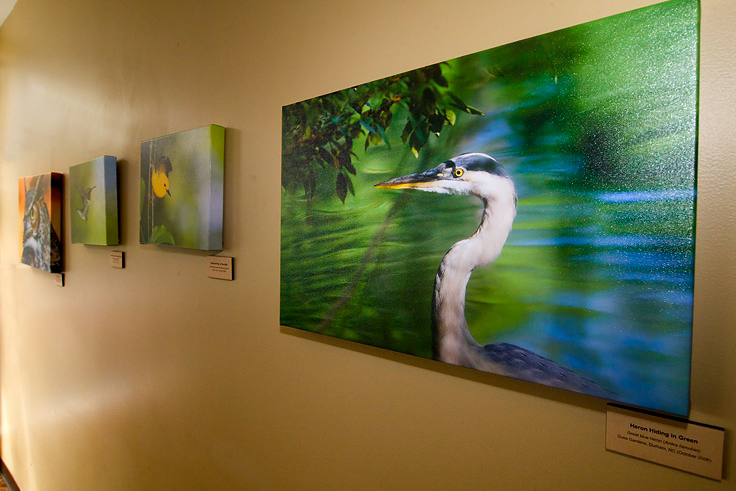
Fig. 14.3.1 :
My photos on display at a local museum. Small museums often have
space
dedicated for rotating exhibits of local artists. Sometimes
they’ll even allow you to sell
prints of your works in their gift shop.
Another
promising avenue for getting your photos publicly displayed is to
approach your local museums, cafes, and even doctors offices
(especially veterinarians). My first exclusive, multi-piece
exhibit was at the local science museum. Small-town museums very
often have space dedicated to rotating exhibits of local artists.
Local cafés and coffee-shops (or similarly “hip” sandwich shops or the like) often
will give local artists priority when choosing artwork for their
walls. Many small-town veterinarians will also take donations of
animal-centric artwork from local artists. Though I’ve yet to try
it, I think frame shops (i.e., businesses that frame artwork) may be
another good venue, especially if you happen to be a customer: an
especially good piece with a frame installed by that shop may earn an
extended claim to some bit of wall space in that shop.
An especially promising venue is any local
conservation group or outdoor club—whether you’re a member or not. These
types of organizations often rely on sales of calendars or other
visually-impactive media to supplement their funding, and free
donations of quality bird images to these should be met with grateful
acceptance. Keep in mind that as a novitiate nature photographer
your most valuable currency may well be exposure rather than monetary
gain. Once the people in your district, city, county, or state
come to recognize your name as that of an accomplished (though perhaps
still rising) local nature photographer, they may be rather more
willing to invest in you by purchasing your printed works.
Fig. 14.3.2 :
One of my photos on the
cover of a calendar put out by a local
nature association. Small, nonprofit
organizations are often desperate for
donations of royalty-free images.
Another
important opportunity for exposure is via community art shows and local
or regional art fairs. Art fairs can be great places to both show
your works and to sell prints. They can also be great
opportunities to meet other artists (whether bird photographers or
otherwise) in your community, and to collect information about other
local opportunities for getting your work displayed. Many
visitors to these shows are curious about the many details involved in
getting the shots on display, and will ask numerous questions about
your technique and your equipment. If you like talking about your
photos with other people—whether about the technical or artistic
aspects—then doing art fairs should be right up your alley.
Fig. 14.3.3 :
My “booth” at a local art
fair consisted of part of a furniture
store that also happened to sell art and frames. Many people came
looking
for art but ended up buying furniture—and vice versa.
Art fairs do tend to be somewhat
labor-intensive. First, you have to carefully pack your artwork,
transport it to the fair, and then set up your display (sometimes under
time constraints). Then you have to stand around for six or eight
hours and answer questions from hundreds of people—very often the same
set of questions over and over again. If your pieces are mounted
on easels, just keeping an eye on them and trying to keep people
(especially children) from knocking them over can be more than a bit
nerve-wracking. I once had someone kick out the leg on an easel
that had five pieces mounted on it; none of them were damaged, but it
made me a bit more nervous throughout the rest of the day as I watched
the visitors file by.
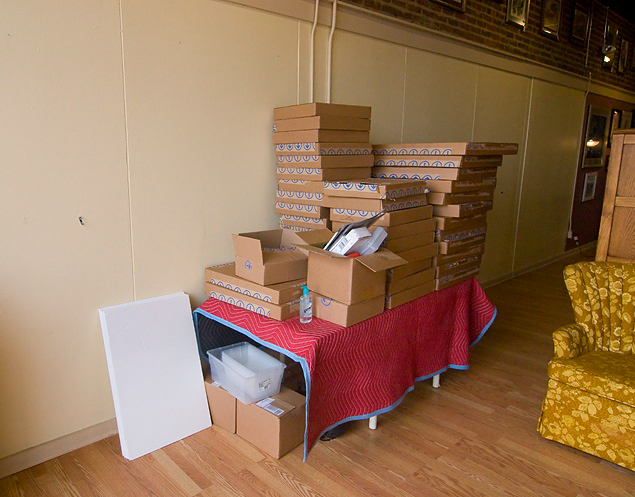
Fig. 14.3.4 :
Setting up at an art show can be a lot of work. Here are my
thirty-seven canvases (in the boxes) before I unpacked them and hung
them on the walls and on easels. I was lucky in this case, in
that the hosting
site had plenty of wall space and tables; some sites require you to
bring a
portable booth and/or tables for all your display needs.
In terms of the positive aspects of art fairs, one
of the most satisfying for me is just hearing the high praise heaped on
my works by visitors seeing them for the first time. Any praise
coming from a non-birder member of the general public is very high
praise indeed, since most people aren’t as obsessed with birds as I am;
to impress the average person with a photo of a “mere bird” is therefore very
encouraging. When the average person steps up to your booth and
suddenly says “Wow!”, you can be reasonably sure that
the compliment implicit in that first reaction is genuine—something
that’s hard to be certain of with the calculated opinions of friends
and family (who will naturally say nice things about your photos just
to make you happy). The honest assessments of your works by total
strangers visiting your booth at an art fair can (either individually
or averaged over the aggregate) be extremely valuable in terms of
future decisions (e.g., deciding which of your photos to enter into a
contest, or to send to a magazine).
There are a number of technical issues to consider
whenever you place your photos on display in a gallery or at a
fair. There’s obviously the issue of optimizing the visual
impact—i.e., choosing an ideal printing medium (paper versus canvas, glossy
versus matte finish, etc.), an ideal frame (if any), and an ideal size
and matting proportion. The effect of these choices can,
unfortunately, be very context-dependent, not only in terms of the
piece being prepared, but also in terms of the display
environment. Pieces look different on an easel versus on a
wall. The lighting in a gallery can also have a very significant
impact, with some lights imposing a yellow cast or even a glare (for
glossy prints under strong lighting). Visiting the gallery
beforehand and taking note of the lighting, wall color, and even the
display height (since glare is typically angle-dependent), can help you
to prepare your pieces for optimal visual impact in the target
setting. If glare is an issue, then choose a matte finish; if the
wall color conflicts with your composition, then use a wide mat and/or
frame; etc. It may seem like a lot of work to fine-tune your
photos to the individual exhibit environment, but keep in mind that
most visitors to the gallery are unlikely to adjust their perceptual
instincts to account for the variables of the environment.
Viewers like what they like based on what they see; if some aspect of
the viewing environment works against that, then it’s unfortunately up
to you rather than the viewer to address that issue to the extent
possible.
For gallery placement, be prepared to approach a
number of different galleries before having one or more pieces accepted
for display. In many locations there are more artists (including
both photographers and other sorts) than gallery space, so competition
can be very high. If any of your photos have been previously
published (such as in a birding magazine), be sure to mention that fact
to the gallery manager, since it may increase your chances of receiving
a favorable decision.
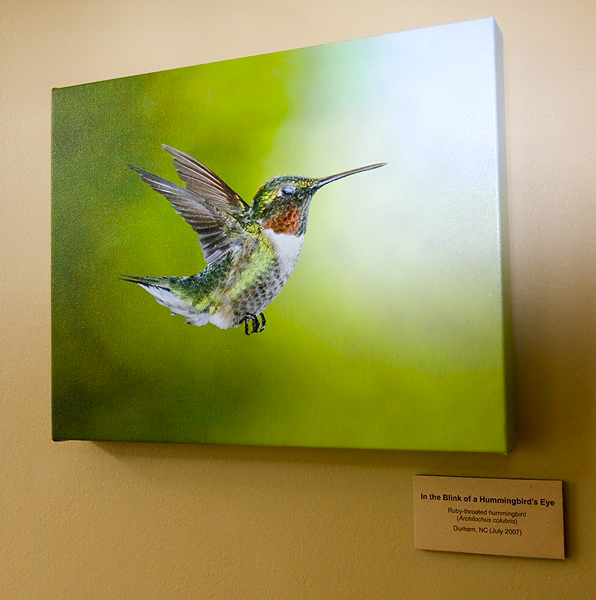
Fig. 14.3.5 : A
plaque with a clever title and other information can help
to generate more interest in your artwork. For photos taken
locally,
listing the exact location can also generate interest, especially for
visitors familiar with the area. Any information you provide about
the image can potentially increase its value in the minds of viewers
by making it seem less like a random snapshot taken by some
anonymous photographer.
For your very best pieces you should put some effort
into crafting a pleasing title for each, since galleries will typically
want to post a small, printed plaque with the title, artist name, and
possibly other information such as medium, date, and location. A
catchy name for a piece may help to strengthen the memory of a
particular work in the mind of a viewer who may later become a
buyer. Sometimes a short description of the piece, including
technical or anecdotal information about the capture, can help to pique
the interest of the viewer.
In terms of framing and media, I’ve been
increasingly drawn to the use of canvas
as a printing medium, and have received only positive feedback from
viewers of my canvas-printed works. Birds printed on canvas often
take on a classical aspect, as of an original study by an oil painter
of yore. Gallery-wrapped canvas pieces produce a
three-dimensional viewing experience, which can be further enhanced by
a high-gloss finish. When properly saturated, a canvas print can
take on the appearance of an original painting, which many viewers find
simply stunning. The ability to produce these types of works via
mere digital processing is nothing short of a technological miracle.
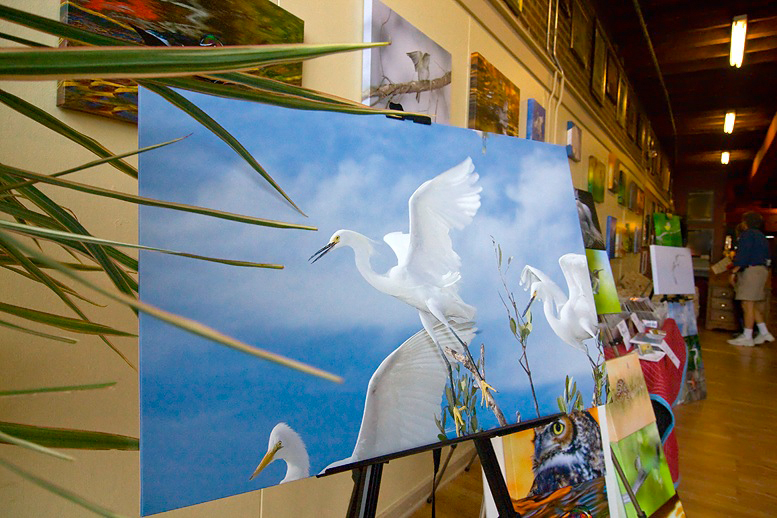
Fig. 14.3.6 :
Canvas prints (i.e., gallery wraps) are a truly amazing invention.
This 20x30 (inch) image of three egrets captivated many, many people at
a
local art fair, many of whom insisted that it could not possibly be a
photo.
Although the effect can be more or less dramatic for different images,
in many
cases the resulting canvas appears almost like an original oil
painting. A high-
gloss finish can enhance that effect by making the “paint” look like it’s still wet.
A important—if
seemingly mundane—issue for art shows is the means of support for your photos.
Depending on the venue, you may or may not be able to hang your photos
on an actual wall. In some venues the artist is required to
assemble his or her own temporary booth via modular cubicle-like wall
elements that can act as walls for the hanging of photos; these can be
very expensive and of course require assembly as well as an appropriate
transport for delivery to the site. Other venues may have wall
space available, though the total size and the prior placement of nails
for hanging may not be ideal for your particular pieces. A
potentially attractive alternative (with certain caveats) is the use of
inexpensive, lightweight easels for the display of multiple pieces in a
small space. Such a display system is shown in use below.
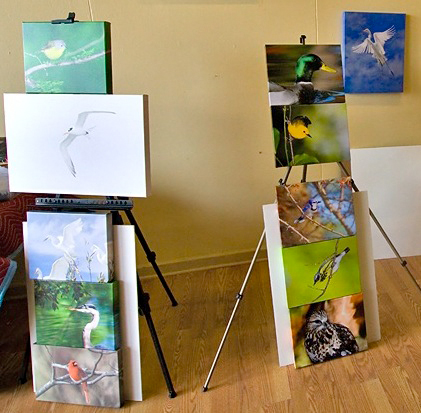
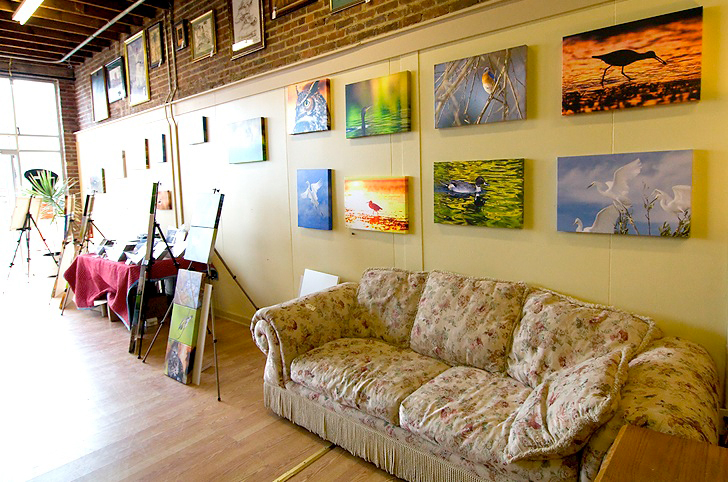
Fig. 14.3.7 :
Using inexpensive, folding easels to display multiple
photos at an art show. When wall space is limited and you have
many pieces to display, a setup like this can be useful. The top
pieces are looped around the center column via their hanging wires,
while the lower pieces are simply resting at an angle against the
foam core backing. Note that this arrangement is very fragile!
The setup shown above was extremely inexpensive ($12
for the easel on the right, $2 for the foam-core; the easel on the left
was $35, and was slightly sturdier) and quite space-efficient.
Five pieces of size 11×14 (possibly including one 16×24) can be accommodated, and the
structure is both easy to set up and easy to transport. The
easels fold up and fit into a tiny bag; I purchased these units at the
highly popular internet-based art supply store Dick Blick. The foam core backing (at bottom) was
purchased the local Kroger’s grocery store. The top two pieces
are held in place by looping their back mounting wires (not shown) over
the central column of the easel, while the bottom three pieces are
resting freely against the foam core which is supported by the front
two legs of the tripod. Note that this entire display is very
fragile; as noted earlier, a passerby accidentally kicked out one of
the legs on an easel of mine and caused the bottom three pieces to
tumble to the floor (though none were damaged). All easels are
inherently susceptible in this way, so I don’t think my use of
ultra-cheap $12 units contributed to this mishap. I was able to
increase the stability of the units by closing the legs somewhat and
applying some masking tape to effect a cross-beam of sorts (not shown
in the figure above).
The nice thing about easels is that they will
generally orient your piece(s) at a slight angle to the vertical, in
contrast to wall-mounting. Depending on the lighting in your
particular venue (and on the finishing of the piece), somewhat more
vivid color tones may come out at normal viewing angles when the piece
is tilted back slightly, as on an easel. This effect obviously
depends on the height of the viewer as well, but for viewers without
restricted mobility (e.g., in a wheelchair) it’s often the case that an
easel-mounted piece with a high-gloss finish will allow for more
exploration of the play of light on the image than the same piece
nailed to the wall.
In terms of matte versus glossy finish, both have
their advantages and disadvantages, though particular pieces can
benefit more from one or the other (though venue lighting can enhance
or negate this effect). I do most of my canvases in glossy,
because I like the way the colors seem to change subtly as I look at
the piece from different angles, but for some pieces a matte finish is
simply more natural. For the northern cardinal (Cardinalis cardinalis) canvas shown
below, for example, the color composition of the piece dictated a matte
finish in order to achieve an aged
effect (i.e., of a painting dulled by age).
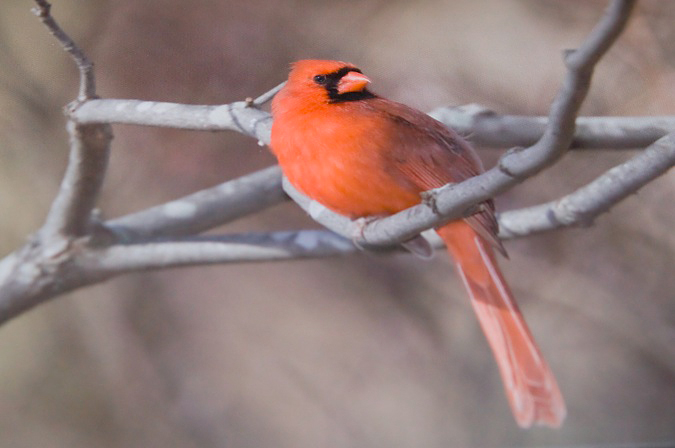
Fig. 14.3.8 :
Canvas with a matte finish. Though I usually prefer a highly
glossy finish
for canvases (so that they look freshly painted), a matte finish can
sometimes work well
by making the piece look liked an aged painting.
When exhibiting at art shows, it’s important to both
position your pieces logically in terms of the visitors’ natural path
through your “booth”, and also to position yourself so
as to be available to answer questions while remaining otherwise
unobtrusive. People entering your booth will, hopefully, be drawn
forward from one piece to the next. Don’t insinuate your presence
too strongly into this progression so as to disrupt the visitor’s
viewing experience. I recommend hovering just within view—but
noticeably attentive to the viewer(s)—so that you’re ready to answer
any questions or comments that are voiced. What I try to avoid at all
cost is the impression of an over-eager salesperson badgering the
potential customer.
Keep in mind that the way you organize your pieces
can have a visual impact distinct from the impact of each individual
piece. When organizing a collection of pieces I try to avoid
placing two pieces with a similar background color next to each other;
instead, I prefer to maximize the contrast between adjacent pieces,
whenever possible, because I think this draws the viewer’s gaze from
one piece to the next, increasing the chances that they’ll take the
time to look at each and every one rather than just glancing at a few
and then continuing on to the next booth.
In terms of print size, I find that pieces in which
the image (not including frame or matting) is at least 16×20 (inches) can be viewed
comfortably from perhaps four to twelve feet away, while images that
are 11×14 or smaller tend to draw viewers
in for a closer look—at say, two to five feet. Thus, if the
layout of your display space in any way restricts viewing distances,
you may want to take this into account when choosing a print size for
your display pieces. For pieces that are framed, the frame size
is influenced by both the image size and the width of the matting (if
any). Functionally, the mat provides a buffer between the image
and the frame, and to a similar extent, between the image and the
surrounding wall. Depending on the image and the wall color, you
may want a wider or narrower mat, and this will dictate the frame size
(assuming you’ve already settled on a print size for the image
itself).
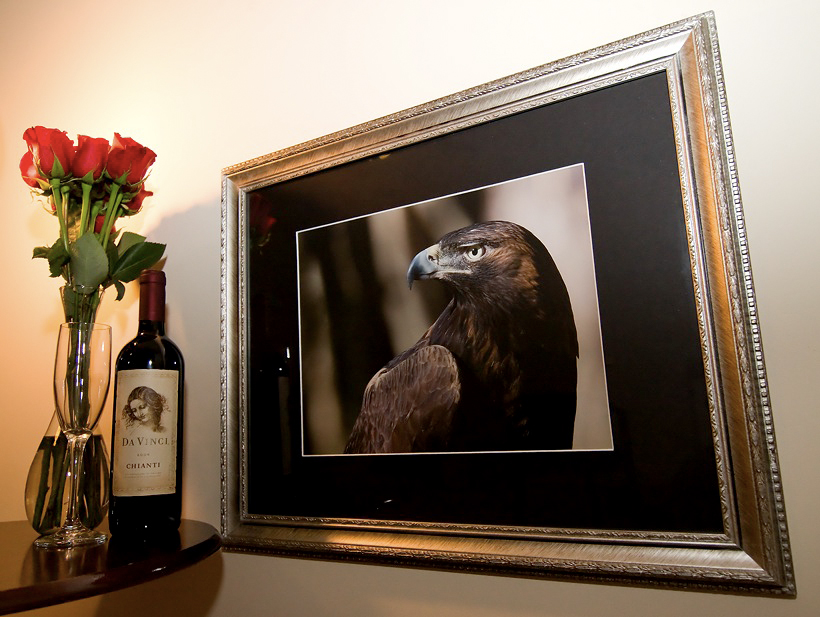
Fig. 14.3.9 : A
wide mat helps to separate the world of the bird (as captured by a
photo) from
the world of your wall (though an especially wide frame could serve
that purpose instead).
Once you’ve chosen a print size for the photo, the mat size (if any)
will then dictate a frame
size. Conversely, if you’re constrained to using a particular
frame size, then the presence or
absence of a mat will dictate your print size. For photos that
look like paintings, you might
prefer to not use any mat at all, and just stick with an ornate frame.
Yet another possibility for getting your printed
works displayed is via photo contests: the winners of such contests are
often granted an exclusive photo exhibit in a highly visible
venue. Personally, I avoid photo contests like the plague.
They typically entail a fair amount of work, and the bigger the prize
the greater the number of formidable competitors you’re likely to
face. Even small, local contests can be very disappointing, even
though you might think that the competitiveness should be rather
limited. The problem with all art contests, whether big or small,
is that they’re typically judged by a panel of one to three “art experts”, with the criteria for winning
effectively decided by the biases of these particular
individuals. Furthermore, those chosen to serve as judges in art
contests are often people with a formal education in art, which means
that they’re probably less concerned with how the general public would
value your photos (i.e., how many honest working people would readily
hang your photo on their wall) and more concerned with the esoteric
dogma of modern art philosophy.
For nature photo contents, there often tend to be
fairly strict rules that have to be followed, which may eliminate many
of your best works from consideration. First, many local contests
require that the photo be taken locally, and that it be taken within a
certain time period (e.g., no more than one year prior to the contest
date). State and national parks, for example, often hold nature
photo contests; obviously, they won’t consider photos you’ve taken in
locations outside those particular park systems. Most nature
photo contests place fairly stringent restrictions on the types of
digital manipulation that can be applied to photos. Manipulations
that you might consider entirely “fair” (such as adjusting the
brightness, increasing sharpness or contrast, or selectively reducing
noise) are often barred by contest organizers who themselves have
little or no hands-on experience with digital nature photography.
Ultimately, you should try to understand precisely why you’re interested in having
your photos put on public display. There are many potential
motivations for seeking wider distribution of your images. One is
to increase your name recognition—i.e.,
to build up your “brand”, to leverage in the future for
various uses. Another is for immediate monetary gain, such as via
sales of prints, or from contest prizes. For many people the
personal satisfaction of having achieved such a level with their
photography is a reward in itself. Once you’ve honestly assessed
your own motivations, you should be better equipped to select a plan
for satisfying your specific goals. In the next section we’ll
consider the specific goal of selling bird photos for profit.
|
|
|